
Segments
By navigating to Audiences > Customer Journey > Segments, you can create and edit segments for the customer journey. A segment represents a group of customers filtered by specific conditions, which can be used for targeted campaigns, analytics, or custom workflows.
Viewing and Managing Segments
When you navigate to the Segments area, you will see a main dashboard displaying your List of Segments. This table provides a quick overview of all your existing target groups with the following details:
- ID: The unique identification number for the segment.
- Name: The title assigned to the segment.
- Contacts: The total number of users currently matching the segment's conditions.
- Creation date: The exact date and time the segment was originally created.
- Last modified: The exact date and time the segment was last updated.
- Actions: This column contains quick tools for managing the segment. You can click the download icon (📥) to Download associated contacts, which allows you to export the list of users within that specific segment.

Editing and Deleting Segments
To edit or delete an existing segment, simply click the checkbox next to the segment's name in the list. Once selected, a top bar will appear indicating the number of selected items (e.g., "1 selected item"). Two new icons will also appear in the top right corner: a pencil icon to edit the segment's configuration, and a trash can icon to permanently delete the segment.

How to Create a New Segment
To build a new targeted group, click the + icon located on the far right side of the List of Segments header. This will open the Create segment window.
Follow these steps to configure your new segment:
- Name your segment: In the Name field, enter a clear and descriptive title for your audience (e.g., "Financial news").
- Add Filters: Use the Filters section to define the exact conditions a user must meet to be included. You will need to configure Select a field to choose the data attribute (e.g., Newsletter, job), choose an Operator for the matching condition (e.g., Is set, equals), and enter a Value if the operator requires a specific text match (e.g., fintech, banks).
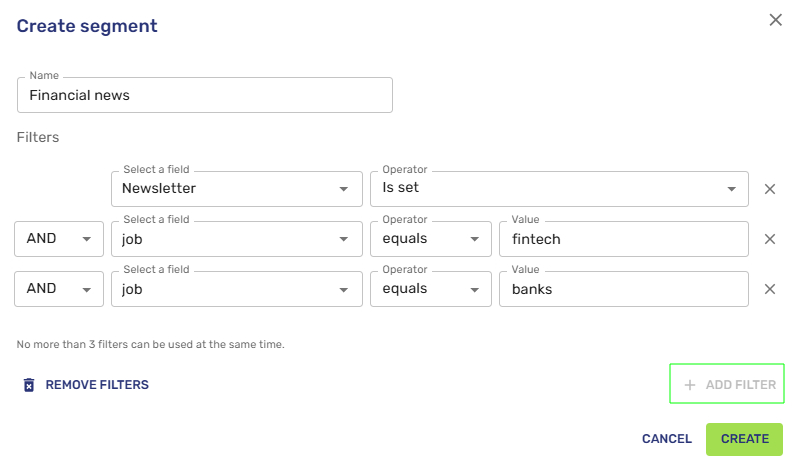
- Combine multiple conditions: If you need to highly target your audience, click + ADD FILTER to stack additional rules. Use the dropdown on the left side of the new filter to select a logical operator to define your criteria: use AND to ensure the user meets multiple criteria simultaneously, or OR to include users who meet at least one of the specified rules. Please note that no more than 3 filters can be used at the same time; once you reach this limit, the Add Filter button will become disabled.
- Clear filters: If you make a mistake or want to start over, you can quickly clear all current rules by clicking the REMOVE FILTERS button (accompanied by a trash can icon) at the bottom left of the window.
- Create the segment: Once you are satisfied with your filtering conditions, click the green CREATE button at the bottom right to finalize and generate your new segment. If you wish to discard your progress, click CANCEL.
Trigger Journeys with Custom Segments
To trigger a new journey using an audience segment, follow these quick steps:
- Navigate to the Journey section in the indigitall console
- Click New Journey > Create manually.
- Select Segment as your entry type, then use the right-hand configuration panel to pick your target segment from the dropdown menu.
- Click Save changes to begin building your flow.
Whether you are targeting engaged users, specific demographics, or custom event lists, using audience segments ensures your messaging reaches the exact right people at the right time.
Updated 3 months ago