
Creating Journeys
API
Step 1: Create a new Journey
Go to the indigitall Console, click on the Journey tab, then you can create a new journey by either selecting a template (from template) or following the steps to start from scratch (create manually).

Step 2. Define the audience
When you begin a new Journey, the very first step in the configuration process is giving your strategy a clear identity.
1. Give the Trip a Title Before selecting your audience, you must assign a name to your Journey in the designated text field. While the default placeholder is "New Journey," it is highly recommended to use a descriptive and unique title.
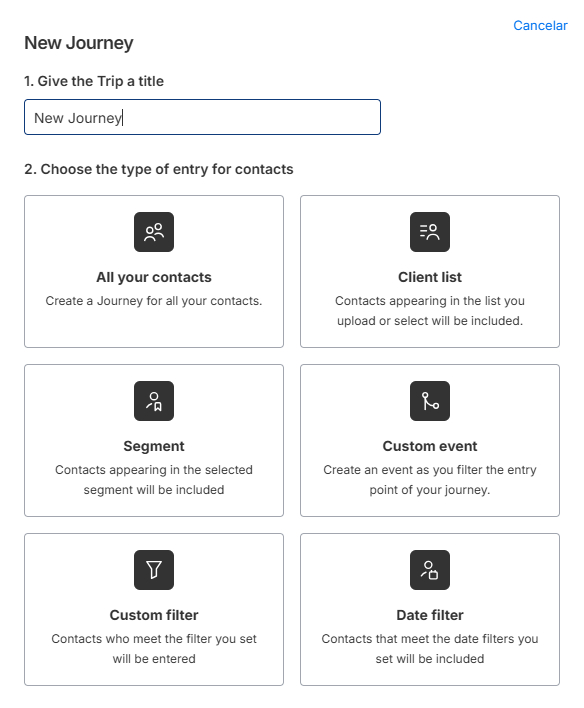
2. Choosing Your Audience
Once you have named your Journey, you can proceed to Step 2 and choose the entry method for your contacts. You can choose from the following six options:
- All Your Contacts This is the broadest entry method. It automatically enrolls every contact currently stored in your database into the Journey. >> Best for: Global brand announcements, updated terms of service, or general holiday greetings.
- Client List This allows you to target a specific group by selecting an existing list or uploading a new one (via CSV file). Only the contacts within that specific file or predefined list will be included. >> Best for: Re-engaging past purchasers from a legacy system or targeting a specific list from an offline event.
- Segment Select a predefined group of users based on shared attributes or past behaviors. This method leverages your existing audience segmentation for precise targeting. >> Best for: Sending a "VIP-only" promotion to users who have a high lifetime value (LTV).
- Custom Event This is a real-time, behavioral trigger. A user enters the Journey the moment they perform a specific action that you have defined as an "event" within the platform. >> Best for: Abandoned cart recovery (triggered when a user adds an item but doesn't buy) or a Welcome sequence triggered by an app installation.
- Custom Filter Use this to create a dynamic entry point. Contacts enter the Journey only if they meet specific criteria or "rules" you set during the configuration (e.g., users located in a specific city or those using a specific device). >> Best for: Location-based offers or technical updates for specific OS versions.
- Date Filter Enroll contacts based on specific calendar events or anniversaries. The Journey triggers when a user’s stored date attribute matches your filter criteria. >> Best for: Birthday rewards, subscription renewal reminders, or membership anniversary celebrations.
Step 3: Audience Segmentation
On the Tools Tab, pulse the Customer Fields to create the appropriate fields associated with your client. They will help you define the filters of the Journey.


Step 4: Sending Messages
Select the type of message you want to send: Push, InApp/InWeb, Email, SMS, and WhatsApp. In addition, indigitall has developed several AI modules to improve the results.
Note on Email Journey Metrics: Remember that an "Opened" status is an estimate. Technical factors like automated security scanners or privacy protections can trigger "false opens." To learn how to accurately interpret these metrics, check out our Email Delivery Statuses Guide.

After the selection, you must to link to the correspondent campaign that previously has been created on the platform.

Step 5: Flow Control
Define different routes for your Journey based on the options that you consider appropriate according to your objectives.
-
FILTER: Choose profile characteristics of the user which are suitable for certain objectives.
-
PUSH EVENTS: Taking decisions based on events (click on a push notification)
-
RANDOM PATHS: Set different journeys for the same objective in order to multiply the
options according to different types of behavior or profiles. -
RETARGETING: Drive sales through the remembrance and incentives to buy after an
abandoned cart. Multiply x25 the success of your campaigns! (Source: indigitall for Retail) -
DELAY: Schedule your messages following your strategy or attending to past behaviors:
immediately after the click or after a period of time to choose
(hours/days/weeks/months/years). -
WEBHOOK: Customize your messages based on events to communicate with the users
immediately on their favorite channel.

Step 7: Validate and Activate
Once you have finished adding all touchpoints to your journey, click Validate to ensure everything is configured correctly, then click Activate.

Step 8: Great! The Journey is done
Congratulations! The Journey is done and you can check how to works in real time.
indigitall coinOnce the journey is done you must to check all statics to detect the click rate or number of leads. Analyse the user behaviour and modify the touchpoints with lowest conversion rate for the ongoing cycle of improvement. Don't get stuck!
Advanced Node Deletion
We have made a major improvement to the Customer Journey design process! From now on, you have much more control when editing your flows. You no longer need to worry about losing all the subsequent steps you had built just because you need to remove a single node.
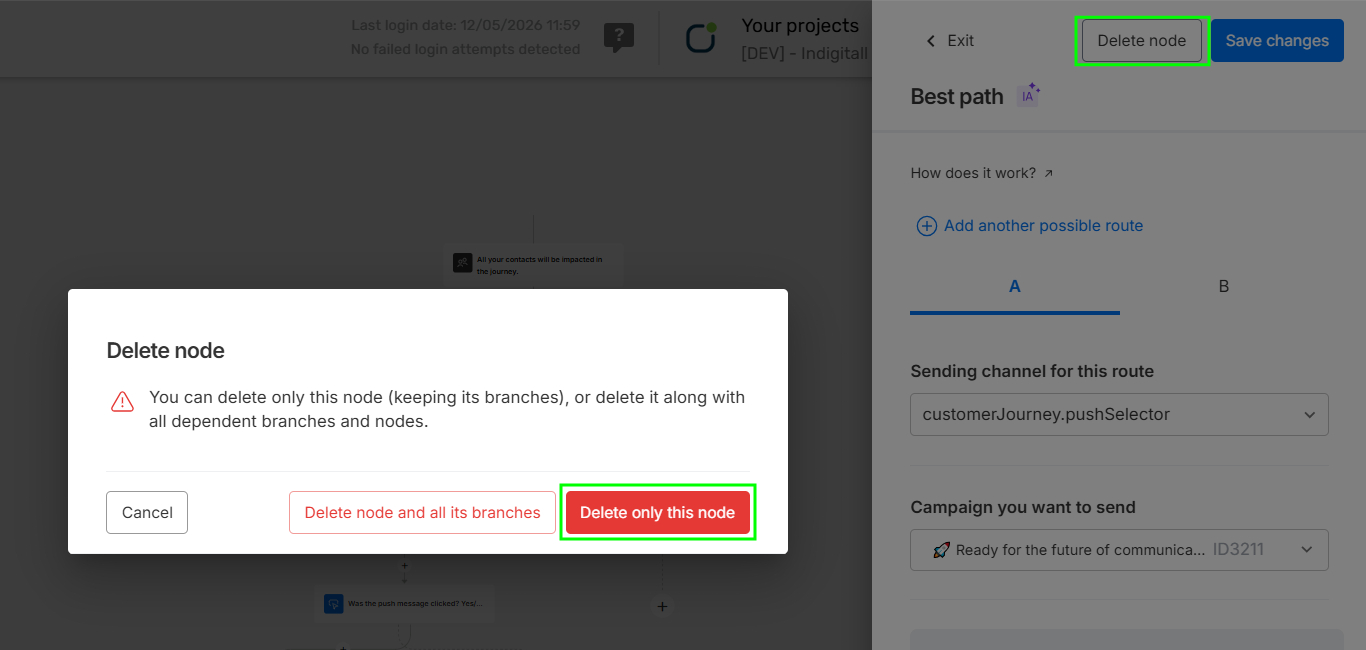
As shown in the image, when you click on Delete node, a confirmation window will appear. This pop-up gives you the flexibility to choose how you want to proceed:
- Delete only this node: This option allows you to remove just the selected node while keeping all of its dependent branches and nodes perfectly intact.
- Delete node and all its branches: This option will remove the selected node along with the entire route built downstream from it.
Editing Live Campaigns
You can edit campaigns within a running Customer Journey without needing to build a new workflow from scratch. This feature is ideal for quick operational updates, such as extending an offer's duration, changing a discount percentage, or updating gift details.
Important: Avoid introducing new variables or data tags that were not part of the original setup, as the live journey engine will not recognize them. To ensure smooth execution, limit your live edits to updating existing text, values, and parameters.
Updated 27 days ago