
Project Requirements
To work with indigitall console you need several basic requirements depending on the channels. Please, you can contact us to ask any doubt. First it is necessary to create each project with all requested requirements for the channels you will use: app push, web push, email, SMS, wallet and chat.
General
To see your projects, access the indigitall console and click on the side menu Configuration.


In the list of projects, the ones you have created will appear, under these parameters:
ID - unique code to identify the project.
Creation date - date the project was created.
Name - name that you have assigned to the project.
App Key - unique and personal value that will link your web / app with the project.
Platform - if it is an app, web or hybrid project (app and web).
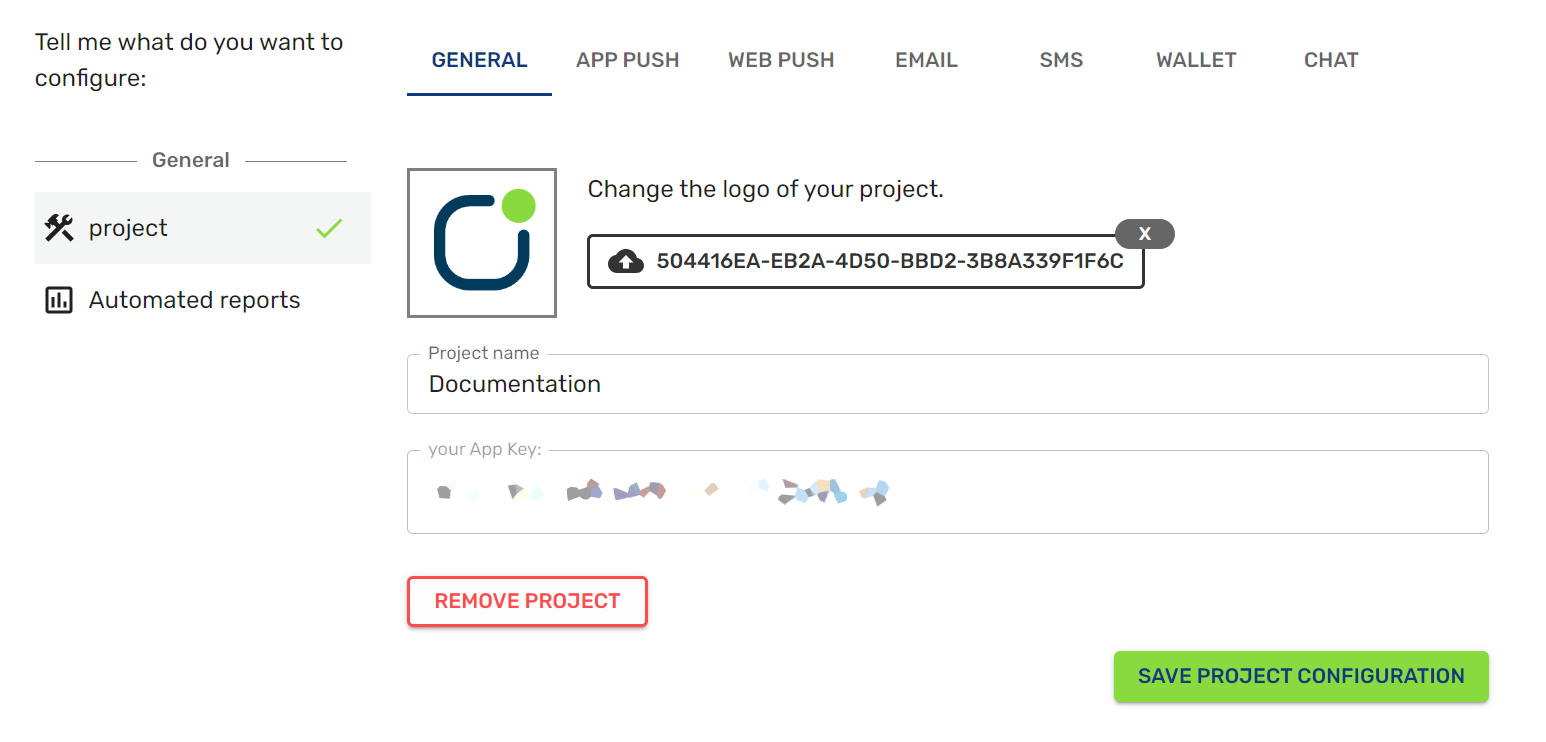
To create a new project, access your indigitall console and click on Projects > New .
You will see a screen like this:

The fields to complete are:
Image: if you upload an image, it will be set as an icon to differentiate your project from others.
Project name: name for the project.
After clicking on the Save Project Configuration button, another screen appears with the App Key generated automatically.
Automated Reports
Choose how often you want to receive an automatic report of your project, who you want to receive it and in which language.

Next, we will explain how you can configure each type of project.
Web Push
Browsers
Once you have chosen the type of web project, you will see the Allowed Domains field.
This field will indicate which domains have access to your project.
If you leave the field blank, all domains will be accepted as valid, and will be saved with the asterisk * symbol, as you can see in the following image.

Project name - name that is assigned for your website or app.
Image - if you upload an image, it will be set as an icon to differentiate your project from others.
Project type - if you want to create a project for a website, for an app or for both.
Safari
To configure your project in Safari browsers, it is necessary to implement a subscription button to request the permission to receive notifications.
It is important to ensure that users can easily find this button and they can subscribe to your web push notifications. The user has to click on this button before receiving the permission notification for web pushes.
Here's an example code:
<script>
  var indigitallParams = {
    appKey: "xxxxxxxx-xxxx-xxxx-xxxx-xxxxxxxxxxxx",
    workerPath: '/indigitall/worker.min.js'
  };

  function onIndigitallLoaded(){
    indigitall.init(indigitallParams);
    if(indigitall.isSafariPushNotificationSupported() && !localStorage.getItem('indigitall.repository.PUSH_TOKEN')){
        var button = document.createElement("span");
        button.innerHTML = `<div id="indigitall-button" onclick="indigitall.launchNotificationPermissionForSafari();document.getElementById('indigitall-button').remove();" style="position: fixed; bottom: 15px; left: 15px; z-index: 999; transition: .2s ease;">
        <a style="display: block; border-radius: 50%; border: 1px solid #74d227; width: 50px; height: 50px; color: #fff; background: linear-gradient(to bottom,#89da3e 1%,#6dbf37 100%); text-align: center; vertical-align: middle; line-height: 60px; cursor: pointer; box-shadow: 0 0 3px #000; transition: .35s ease; transition-property: all; font-size: 20px; text-shadow: 0 0 2px rgba(0,0,0,.5); position: relative;">
            <svg style="width:24px;height:24px" viewBox="0 0 24 24">
            <path fill="#f5f5f5" d="M21,19V20H3V19L5,17V11C5,7.9 7.03,5.17 10,4.29C10,4.19 10,4.1 10,4A2,2 0 0,1 12,2A2,2 0 0,1 14,4C14,4.1 14,4.19 14,4.29C16.97,5.17 19,7.9 19,11V17L21,19M14,21A2,2 0 0,1 12,23A2,2 0 0,1 10,21" />
            </svg>
        </a>
        </div>`;
        document.getElementsByTagName("body")[0].appendChild(button);
    }
}
</script>

<script src="/indigitall/sdk.min.js" onload="onIndigitallLoaded()"></script>
App KeyDon't forget to replace the App Key with your project data.
Advanced
In advanced, you can use various parameters to improve the effectiveness of your notifications.
- Chunked delivery: If chunked delivery is enabled, you can set a rate of notifications per hour that will be delivered every time you send a campaign instead of delivering them immediately.
Chunked delivery does not allow the use of Best Moment (AI module).
- Notifications per hour - You can set the number of notifications sent per hour. The minimum number of notifications per hour is 12,000. (Setting 12,000 notifications per hour is equivalent to sending 1,000 notifications every 5 minutes every hour).
- Add exclusion time - choose the time slot in which you do not want notifications to be sent.

- Add a monochrome logo to your project - monochrome image that will be displayed at the top of notifications, for chrome on android.
- Enable multidomain - If you enable the multidomain option, all the domains that are connected to this project will behave as one.
App Push
Android
You need to upload the certificate by June 2024Apps using the deprecated FCM legacy APIs for HTTP and XMPP should migrate to the HTTP v1 API at the earliest opportunity. Sending messages (including upstream messages) with those APIs was deprecated on June 20, 2023, and will be removed in June 2024.
Until now to send app push notifications to android devices it was necessary a GCM/FCM Server Key provided by FCM. Now it is necessary to upload a certificate to continue sending app pushes. Please discover here how to upload this file.
For the Android platform, the fields to configure are the following:

FCM Server Key: This field is no longer needed and we will remove it in the next months. Now only it is necessary to upload the certificate. (Only for your info: this key is provided by Firebase Cloud Messaging (FCM). You can register in FCM, you can follow this tutorial to discover how to do it).
NEW! Upload the Certificate: You need to upload a JSON file provided by FCM. We explain here how to obtain this certificate. Remember! It is compulsory to upload it by June 2024.
Allowed apps market ids: You can specify the market identifiers of the applications that can use your project. If this field is empty, all applications are accepted.
Harmony
For the Harmony platform, the fields to configure this platform are the following:

HMS Client ID - This key is provided by Huawei Mobile Services (HMS). You must register in HMS, you can follow this tutorial to learn how to do it. This field is required to receive notifications on Android.
HMS Client Secret - This key is provided by Huawei Mobile Services (HMS). You must register in HMS, you can follow this tutorial to discover how to do it. This field is required to receive notifications on Android.
iOS
For the iOS platform, the fields to configure this platform are the following:

For iOS there are two possible configurations, only one is needed:
-
P12 Certificate: You must upload a P12 certificate file provided by Apple and its password if it exists, you must also provide the application package ID.
-
P8 Certificate: You must upload a P8 certificate file provided by Apple, you must also provide the Bundle ID, Team ID and Key ID application.
Advanced
In advanced area, you can use various parameters to improve the effectiveness of your notifications.
- Chunked delivery: If chunked delivery is enabled, you can set a rate of notifications per hour that will be delivered every time you send a campaign instead of delivering them immediately.
Chunked delivery does not allow the use of Best Moment (AI module).
- Notifications per hour: You can set the number of notifications sent per hour. The minimum number of notifications per hour is 12,000. (Setting 12,000 notifications per hour is equivalent to sending 1,000 notifications every 5 minutes every hour).
- Excluded hours: Choose the time slot in which you do not want notifications to be sent.

Add a monochrome logo to your project - monochrome image that will be displayed at the top of notifications, for chrome on android.
Enable multidomain - If you enable the multidomain option, all the domains that are connected to this project will behave as one.
Email
To send email campaigns, you need to create the email configuration:
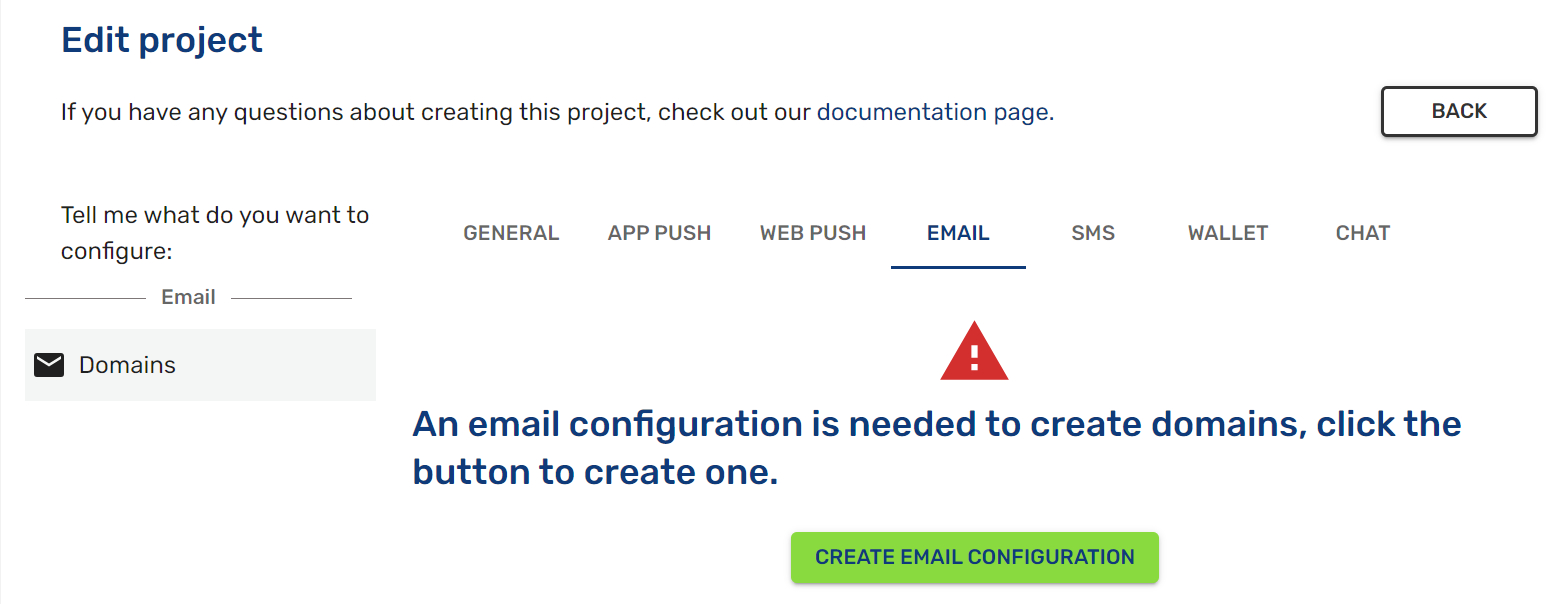
For this, you need a domain name (e.g. our_company) and the domain (e.g. indigitall.com).
Also it is possible to create the senders. The Sender or Email Sender gives information from where the email will be sent and it will appear in the field "From:" when the email is received. You can see all information here.

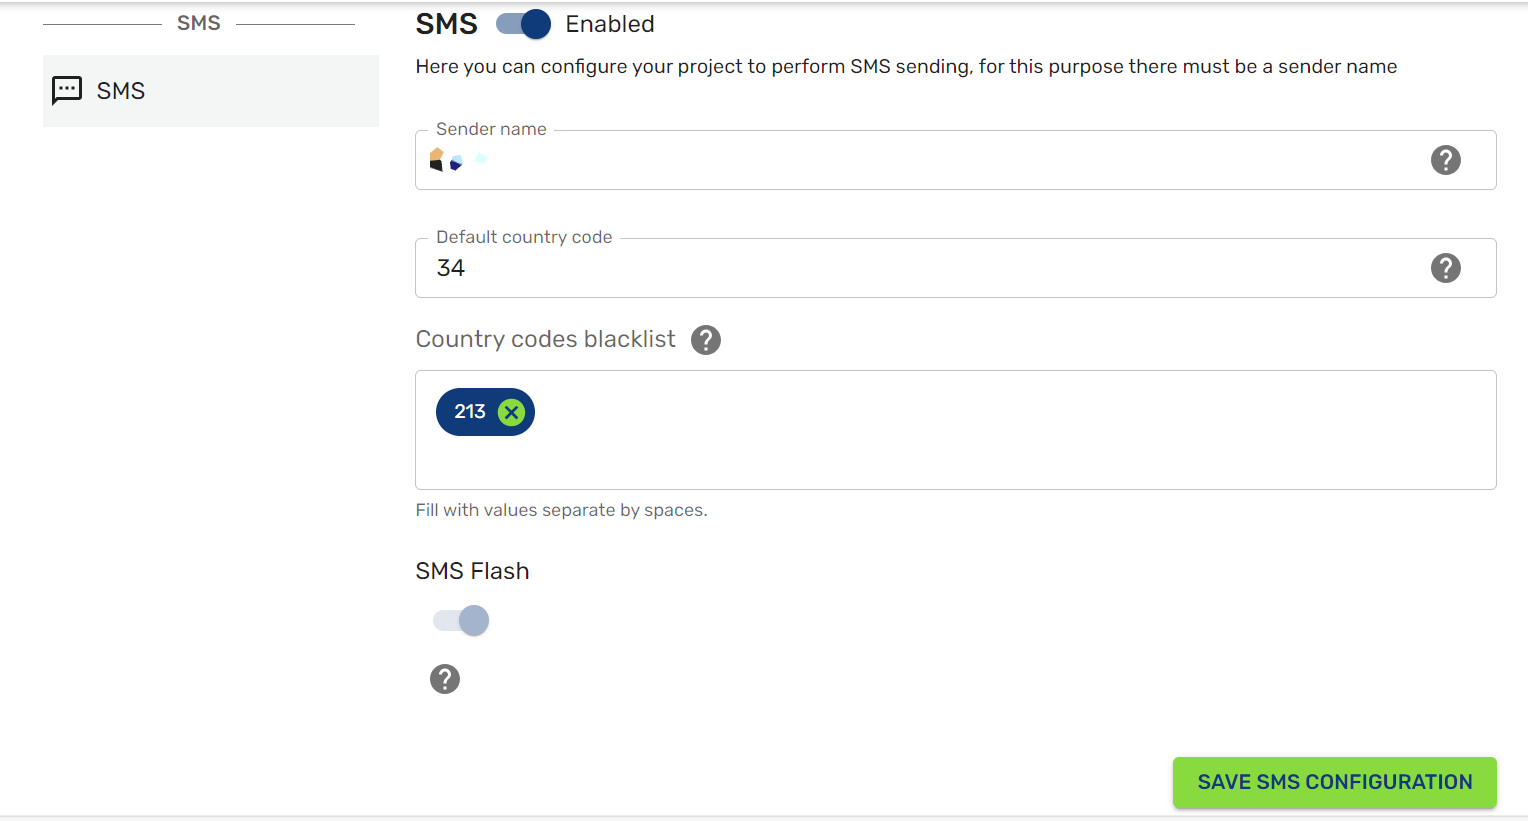
SMS
It is necessary to create the SMS configuration.
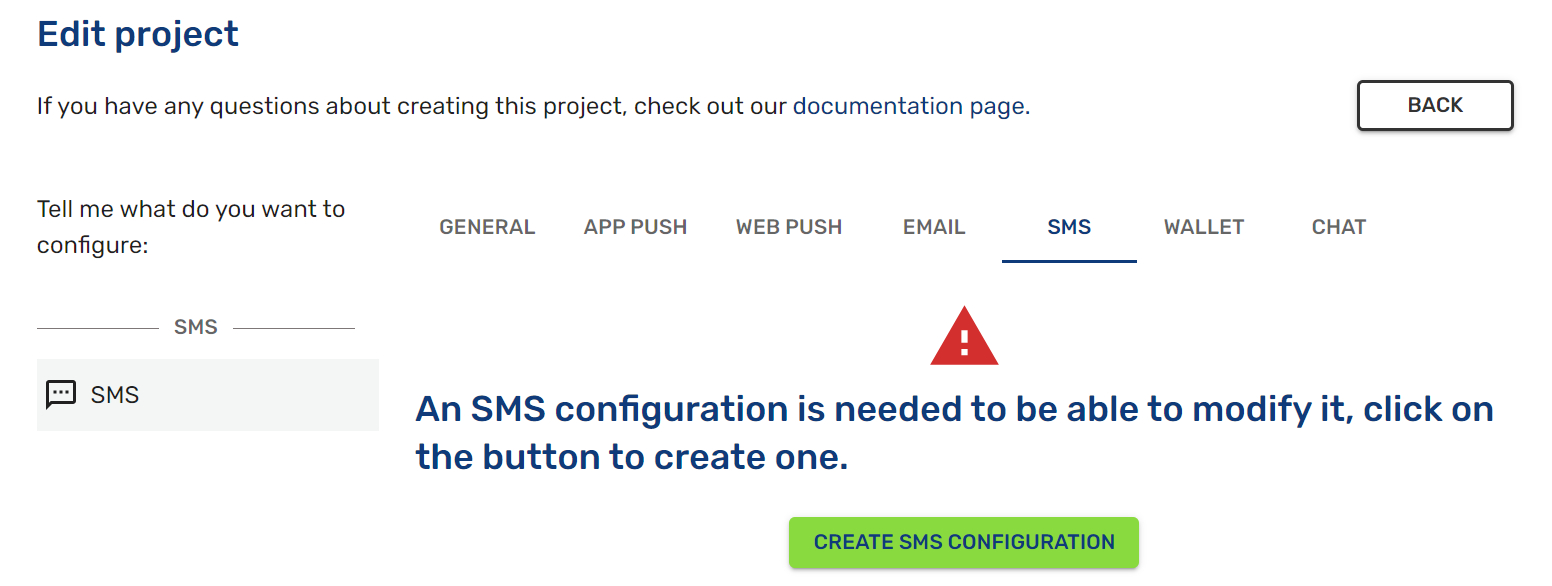
For this area, you need the following fields:
- Sender name: The sender is the name or number that the user will see as the sender of the message received.
- Default country code: The country code to send SMS.
- Country codes blacklist: Sendings will not be performed to the indicated countries.
- SMS Flash: It is displayed directly on the screen, without the need to open the SMS application.
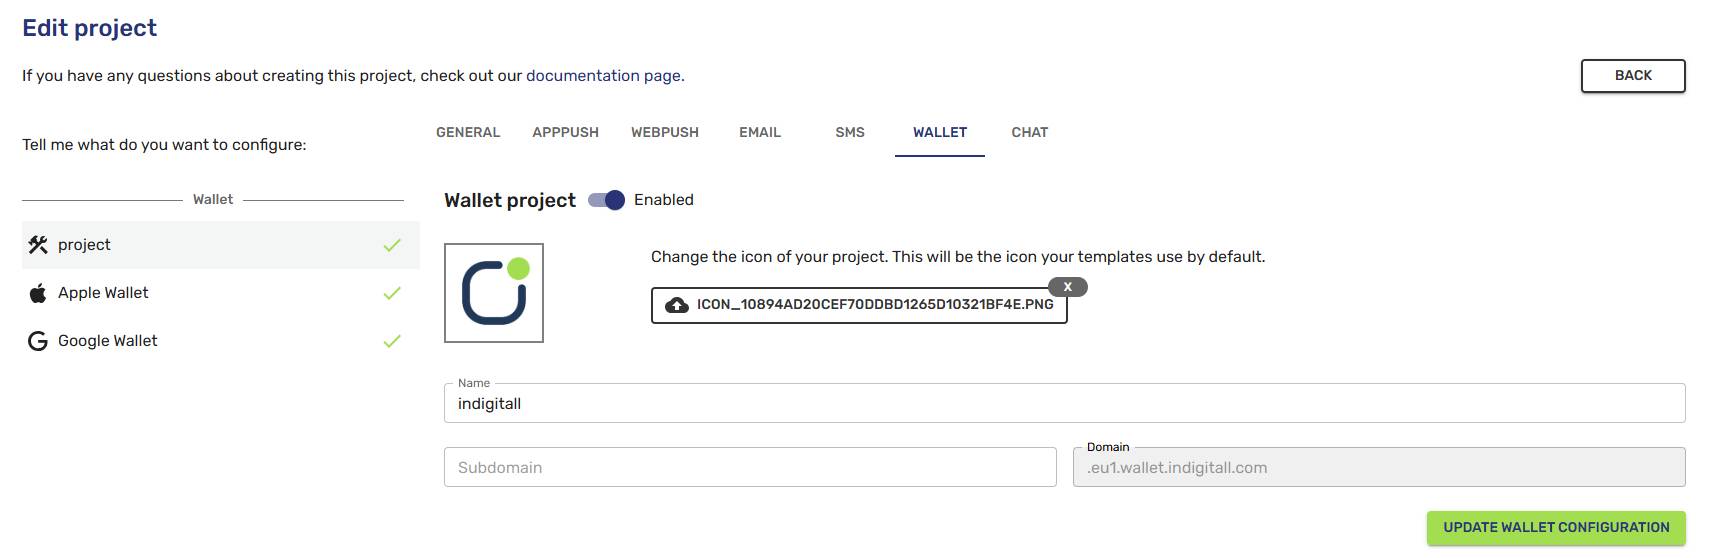
Wallet
It is necessary to enable the project. Then, you will be able to upload the icon (it will be configured for all new templates), assign a name, and the previously chosen subdomain will also appear.
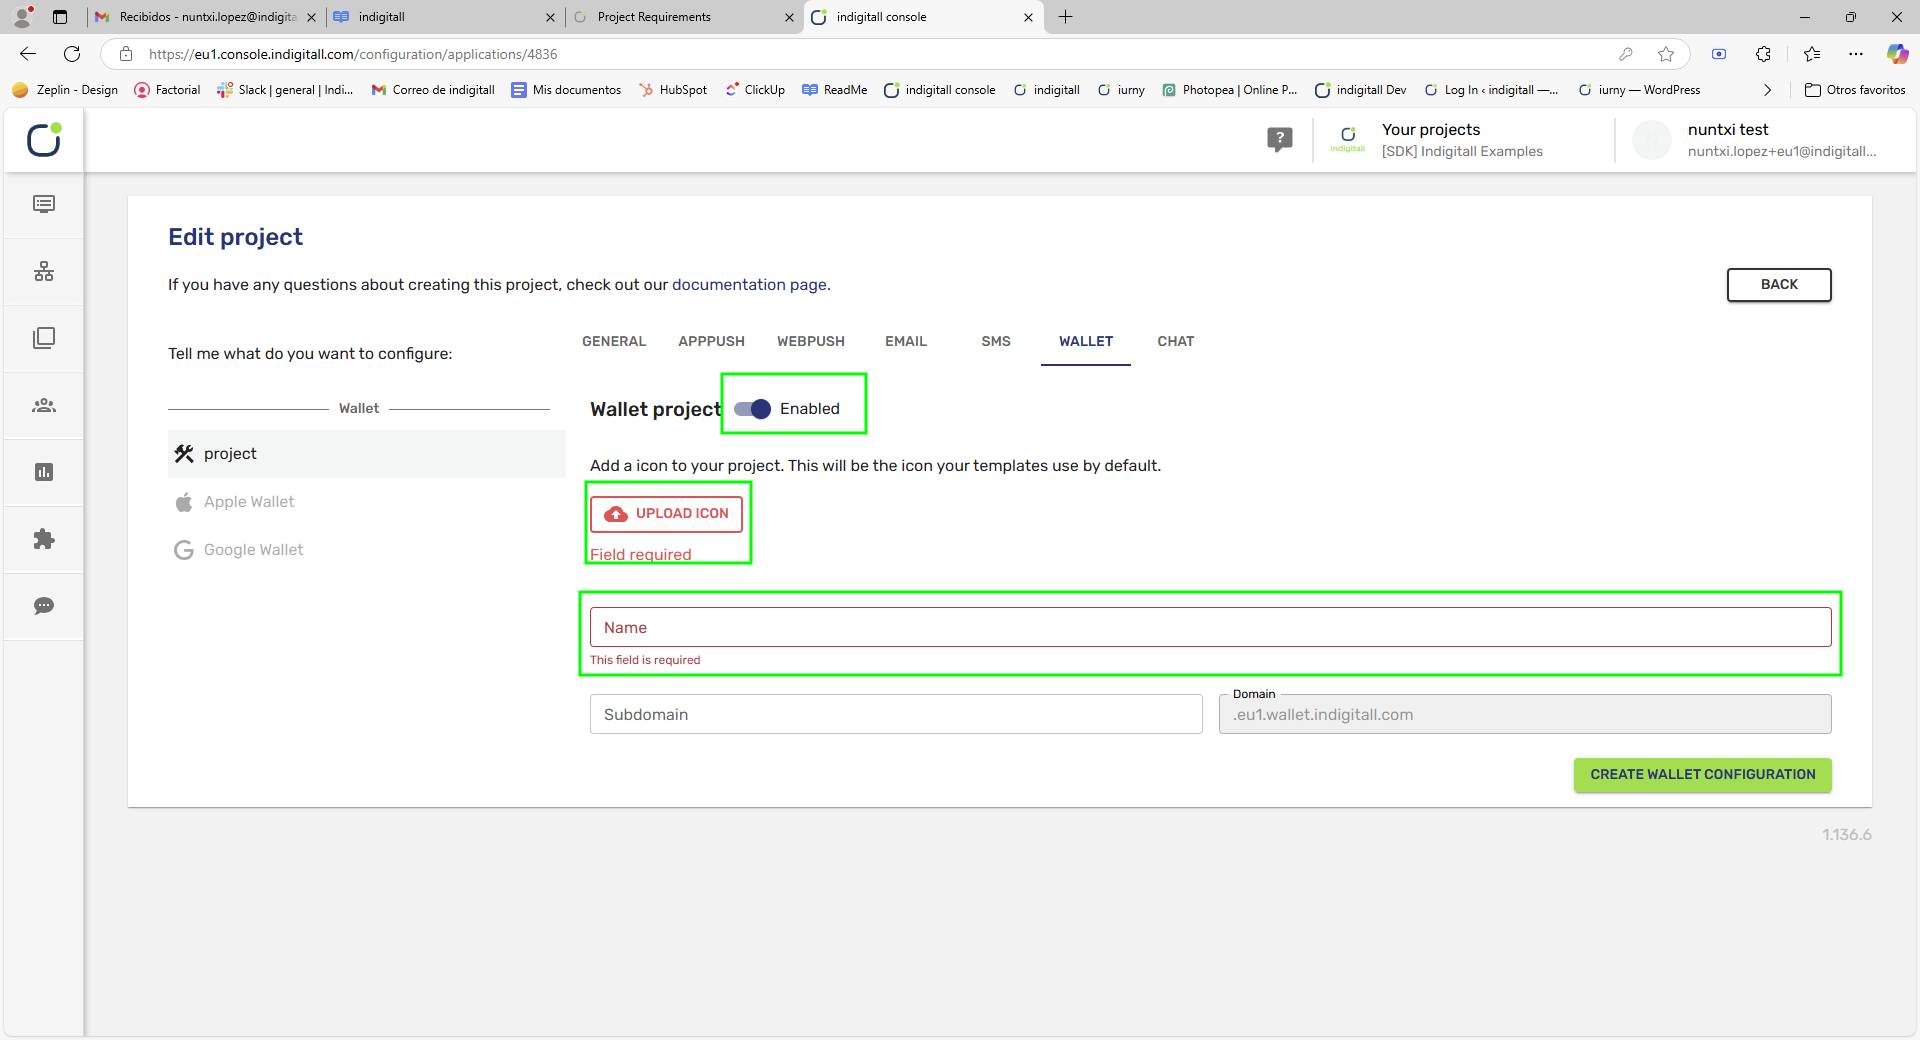
You also need to configure the Apple (iOS) and Google (Android) sections as explained in the specific sections.
Chat
The Chat tab serves as your central command center for managing and activating real-time communication channels. As an official Meta Business Partner, we provide a streamlined, end-to-end experience to help you integrate and scale WhatsApp Business API services, from initial setup to global deployment.
This section is organized into specific integration modules to ensure seamless, reliable connectivity between your business and your customers. Using the left-hand sidebar, you can access and manage the core components of your chat ecosystem:
Chat Service
Use the primary toggle to enable or disable chat functionality across your system. When set to Enabled, the service becomes active and ready for further configuration.
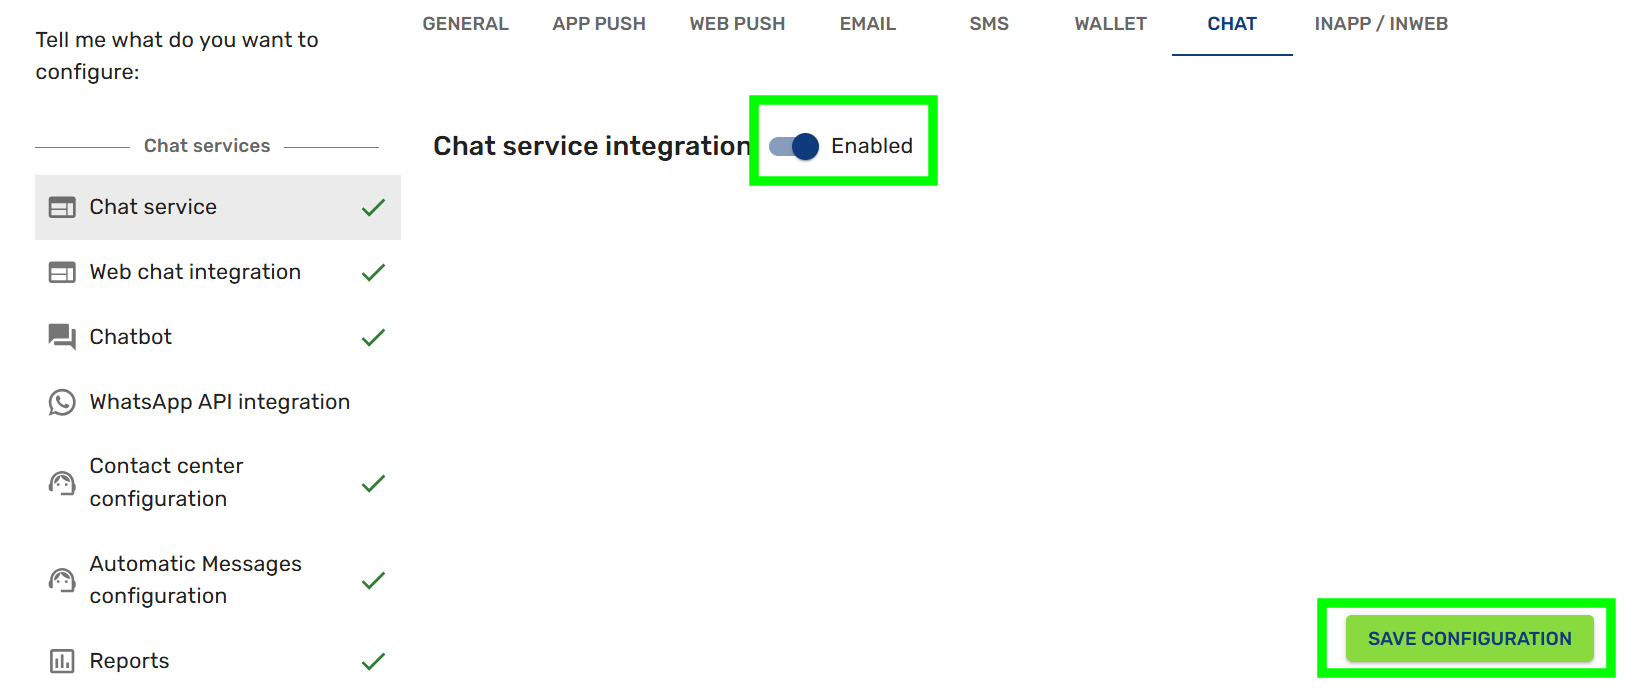
- Important: Saving Your Changes
After filling out the required fields in any sub-section, you must click the green "SAVE CONFIGURATION" button located at the bottom right of the screen. This button is present across all configuration pages and is essential to apply your changes and successfully complete the verification process.
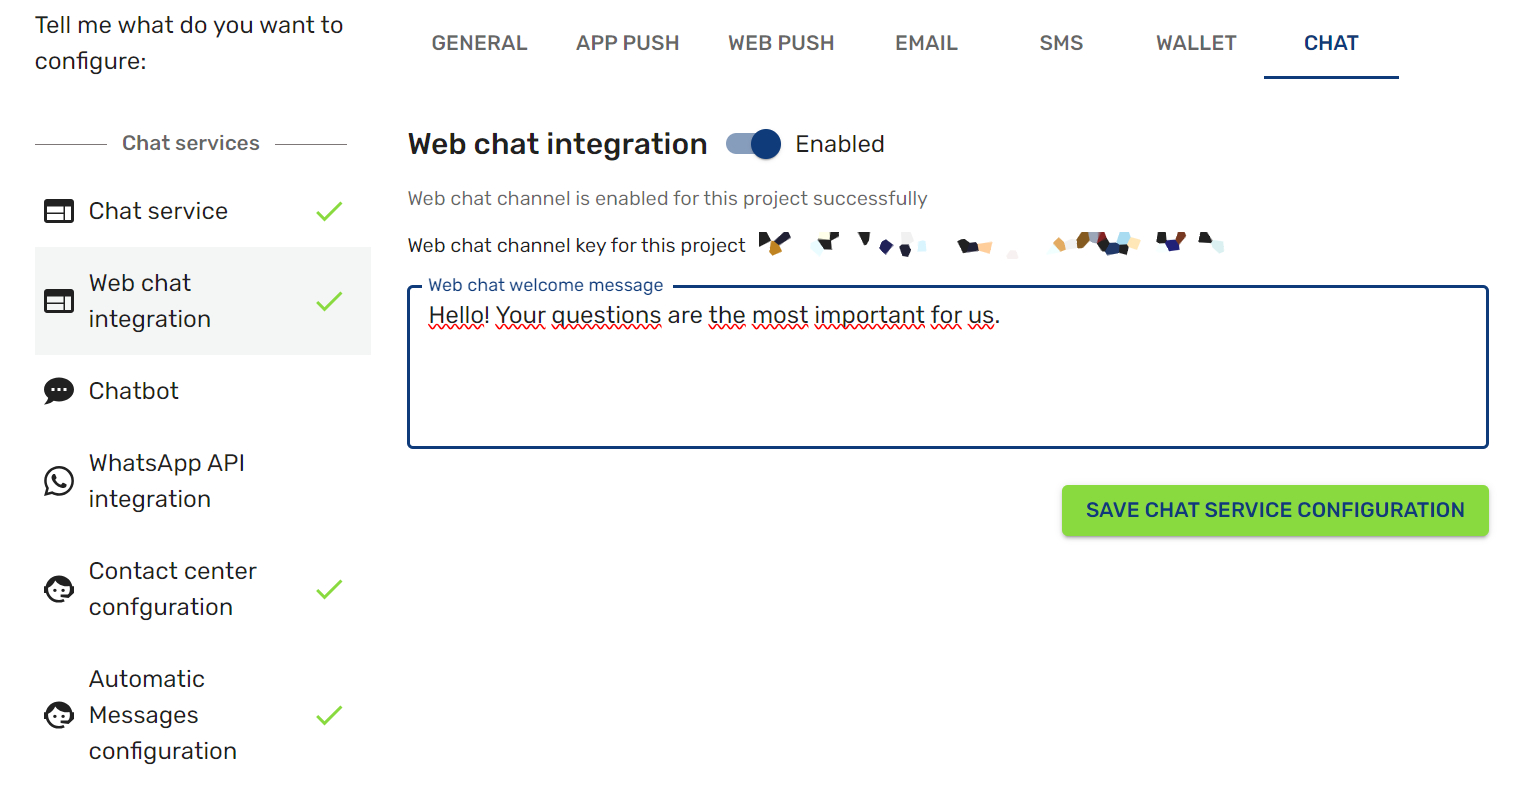
Web Chat Integration
The Web Chat Integration section allows you to deploy and customize a live chat widget directly on your website or customer portal. This tool is essential for providing real-time support and engaging with your visitors instantly.
Once you select this option from the sidebar, you can manage the following elements:
- Status Toggle: Use the Web chat integration switch to enable or disable the channel for your specific project.
- Web Chat Channel Key: This unique identifier is generated automatically once the service is enabled, allowing you to link the chat service to your web environment.
- Welcome Message: You can personalize the initial greeting that users see when they open the chat. For example: "Hello! Your questions are the most important for us."
Chatbot Configuration
The Chatbot section allows you to integrate automated intelligence into your communication channels. You can choose between a standard structured bot or a more advanced Generative AI agent to handle customer interactions.
Depending on your needs, you can select from the following service types:
-
None: Select this if you do not have an active bot.
-
Dialogflow: Select this if you are using a bot with predefined options (static conversation flows). The configurable fields are:
- Dialogflow Project ID: The unique project identifier (provided by indigitall).
- Dialogflow Credentials: The authentication credentials required to access the project (provided by indigitall).
- Default Language: The primary language used by the bot.
- Priority: Defines the processing priority. Enter a whole number greater than or equal to zero. Note: The higher the number, the higher the priority. -
AI Agent: Select this to configure a Generative AI agent. You must complete the following fields to define its behavior:
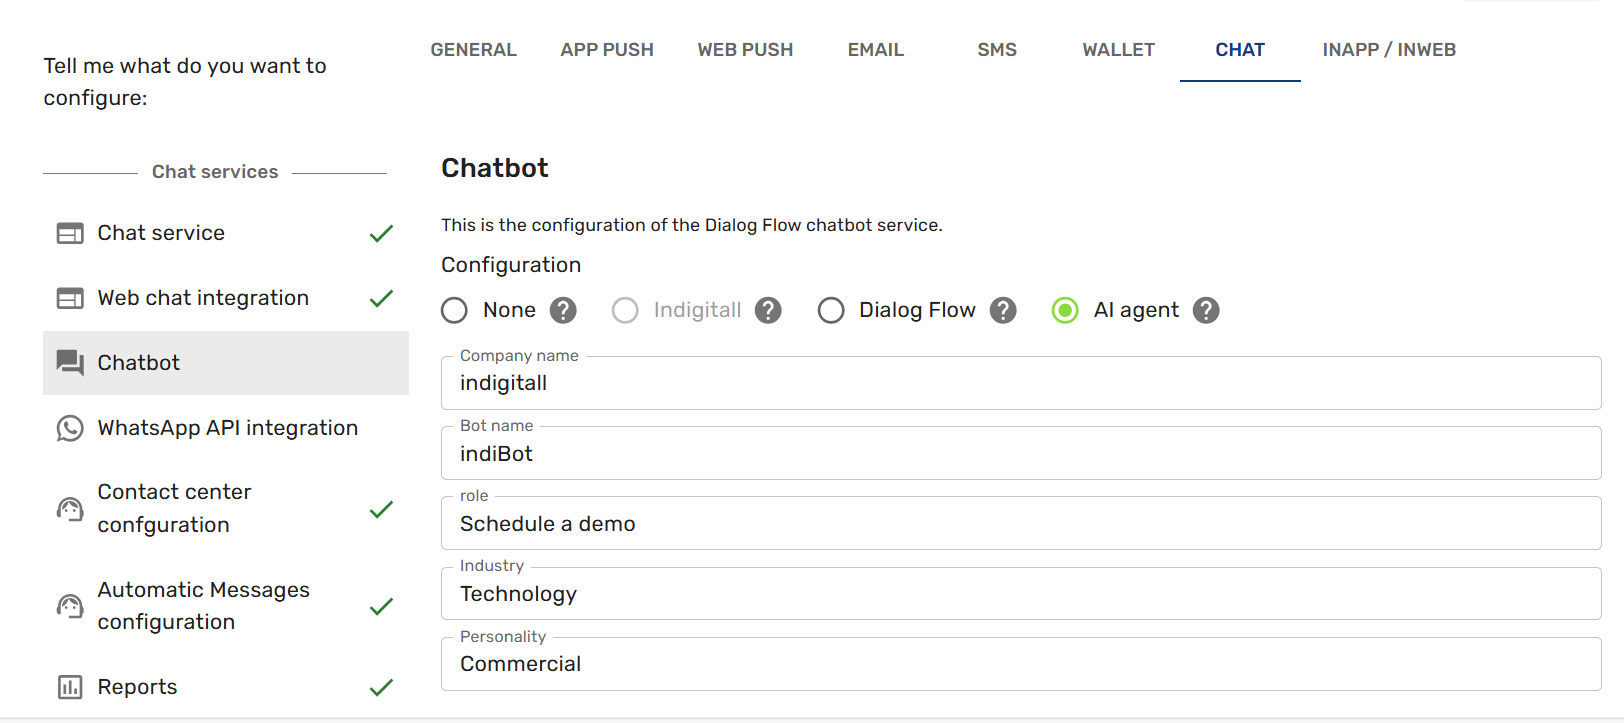
- Company Name: Your organization's name.
- Bot Name: The display name for your agent.
- Role: The primary goal of the bot (e.g., Customer Support, Sales, Lead Gen).
- Industry: The business sector to provide context for the bot.
- Personality: The specific tone the bot should use (e.g., Commercial, Professional, Casual).
- Advanced Settings. The following fields are optional but recommended for safety and monitoring:
- Input Blacklist: A comma-separated list of trigger words. If a user includes any of these words in their message, the bot will block the interaction and will not provide a response.
- Output Blacklist: A comma-separated list of prohibited words. The bot is strictly prevented from using any of these terms in its responses.
- Alert Email: Designate email addresses to receive system notifications regarding service costs.
To complete your chatbot configuration and ensure all your settings are applied, pay close attention to the action buttons located at the bottom of the section.
Managing Chatbot Memory
As with all other sections in the platform, you will find a green button at the bottom right:
- SAVE CONFIGURATION: Clicking this button is essential to verify your steps and store all the data you have entered. Always click this button before navigating away from the page to avoid losing your progress.
To the left of the save button, there is an additional option that requires careful handling:
- SAVE AND RESET MEMORY: This button saves your current settings but simultaneously wipes the chatbot's existing memory.
>> Use with Caution: Clicking this will cause the bot to "forget" previous interactions and context immediately. This can lead to unexpected behavior or disruptions in ongoing customer conversations. Only use this option if you specifically intend to restart the bot's learning or context from scratch.

WhatsApp API Integration
The WhatsApp API Integration section guides you through the official process of connecting your business to the WhatsApp ecosystem. As a Meta Business Partner, we facilitate this multi-step verification to ensure your channel is fully compliant and ready for high-volume messaging.
The setup is divided into three critical phases, which you can track at the top of the interface:
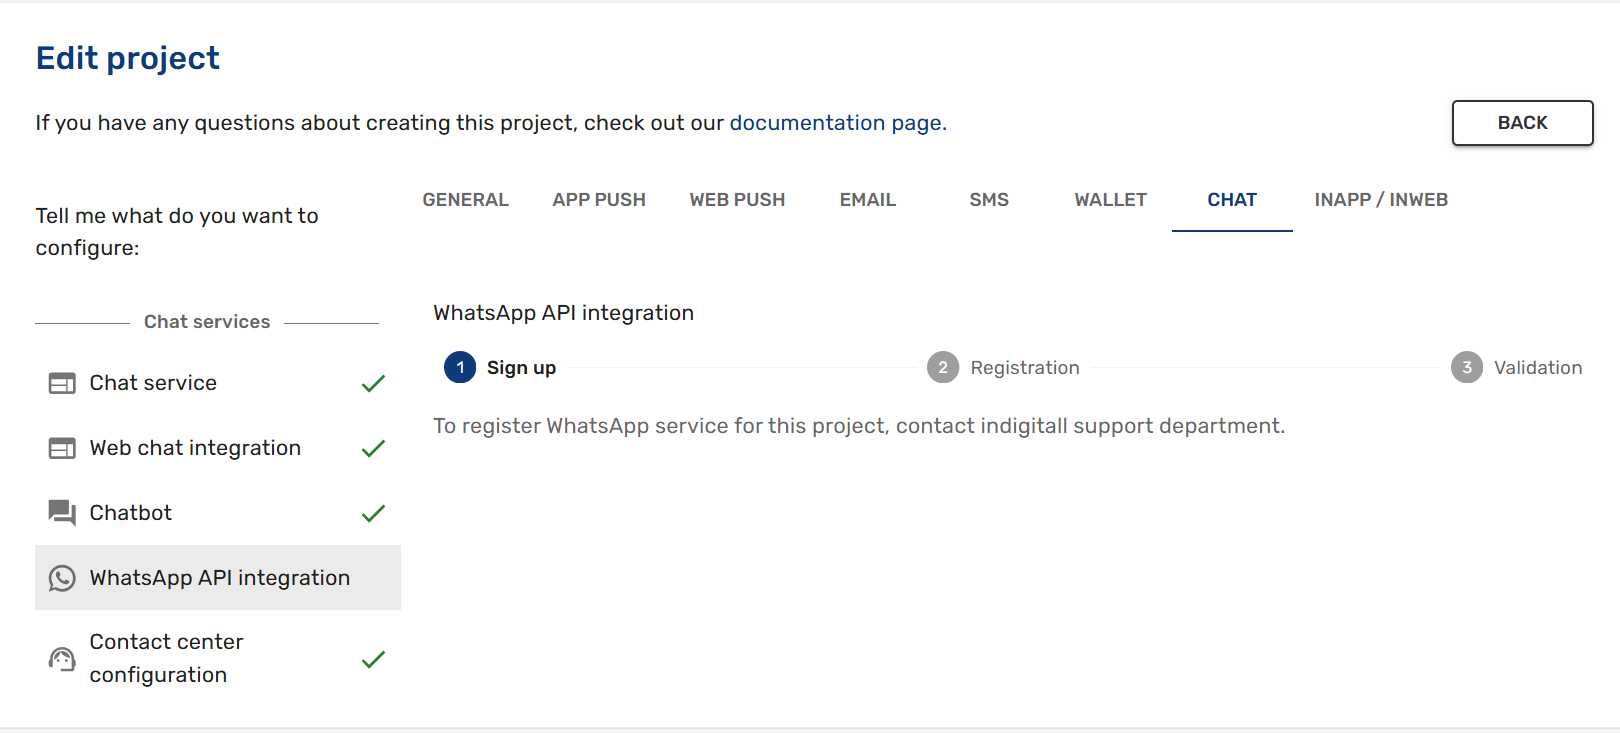
- Sign up: The initial phase where you express interest in the service. To begin, you must contact the indigitall support department to register the WhatsApp service for your specific project.
- Registration: During this stage, your official business data and phone number are submitted for review.
- Validation: The final phase where Meta verifies your business identity to grant full access to the API.
Once your WhatsApp number is successfully enabled and has passed the Sign-up, Registration, and Validation phases, you can fine-tune your messaging operations through the following advanced settings.
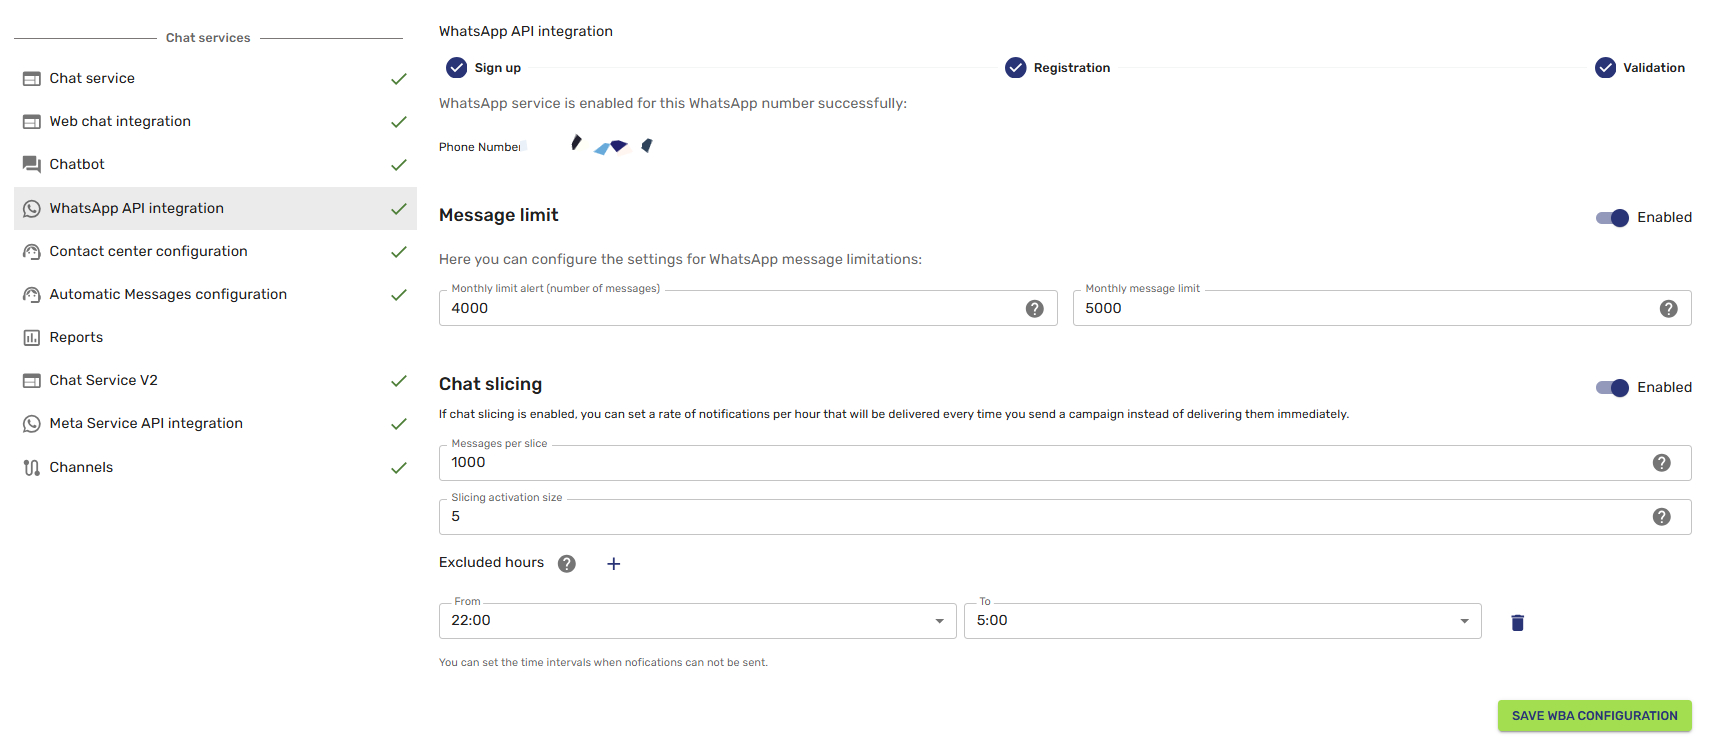
Message Limit
This section allows you to manage your messaging volume to control costs or adhere to specific campaign limits:
- Message Limit Toggle: Enable or disable global message limitations for your WhatsApp channel.
- Monthly Limit Alert: Set a specific threshold (number of messages) at which the system will trigger an alert notification.
- Monthly Message Limit: Define the absolute maximum number of messages that can be sent through this channel per month.
Chat Slicing
If enabled, Chat Slicing allows you to stagger the delivery of your messages rather than sending them all at once. This is particularly useful for managing inbound traffic to your call center:
- Messages per Slice: Define the number of notifications to be delivered in each hourly interval.
- Slicing Activation Size: Set the minimum campaign size required to trigger the slicing mechanism.
Excluded Hours
To respect customer rest times or operational hours, you can define specific periods when notifications will not be sent:
- Time Intervals: Use the "From" and "To" selectors to set a blackout period (e.g., 22:00 to 5:00) during which all outgoing messaging will be paused.
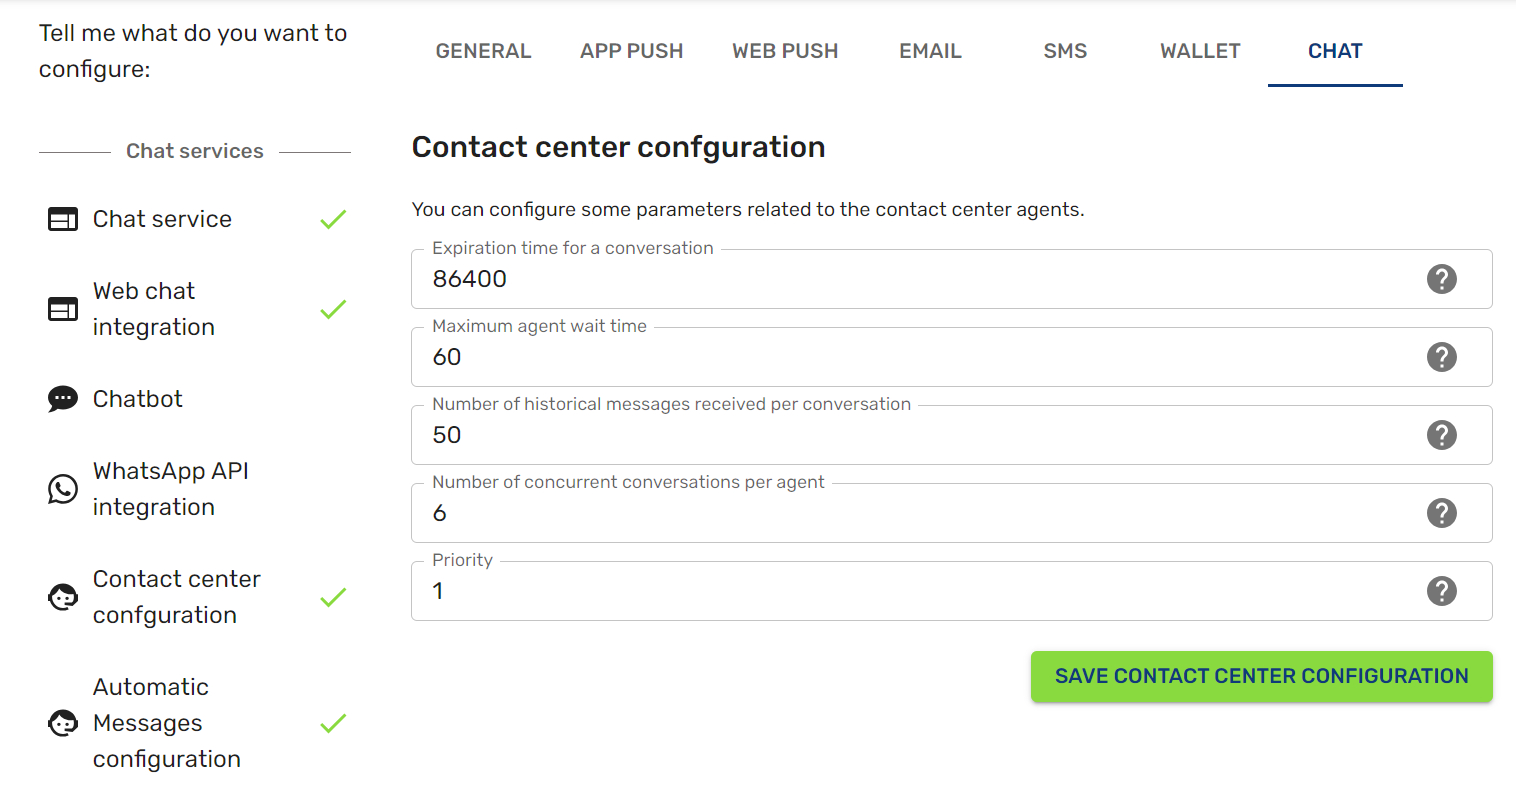
Contact Center Configuration
The Contact Center Configuration section allows you to manage the operational parameters for your live support agents. By fine-tuning these settings, you can optimize response times and ensure a balanced workload across your support team.
You can customize the following fields to match your team's workflow:
- Expiration time for a conversation: This defines the duration (in seconds) after which a conversation will expire. The minimum allowed time is 300 seconds (5 minutes), and the system defaults to 86400 (1 day).
- Maximum agent wait time: Sets the maximum time a user will remain in the queue waiting for an available agent.
- Number of historical messages received per conversation: Determines how many previous messages an agent can view once a conversation is assigned to them. While the default is 20, you can adjust this to provide more context to your team.
- Number of concurrent conversations per agent: Limits the maximum number of active chats assigned to a single agent at any given time. The default value is 6.
- Priority: Use a whole number (0 or higher) to define the processing priority of this configuration. Note: Higher numbers indicate higher priority.
Automatic Messages Configuration
Within the Chat tab, you have full control over how your system interacts with users through automated responses and scheduled availability. This section allows you to customize the Automated messages for the contact center, where you can define triggers for agent transfers and closures, and manage Automatic AI Agent Messages to maintain a consistent voice for your generative bot. Additionally, you can configure Customer service hours to manage user expectations and ensure your team is only assigned conversations during active operational windows.
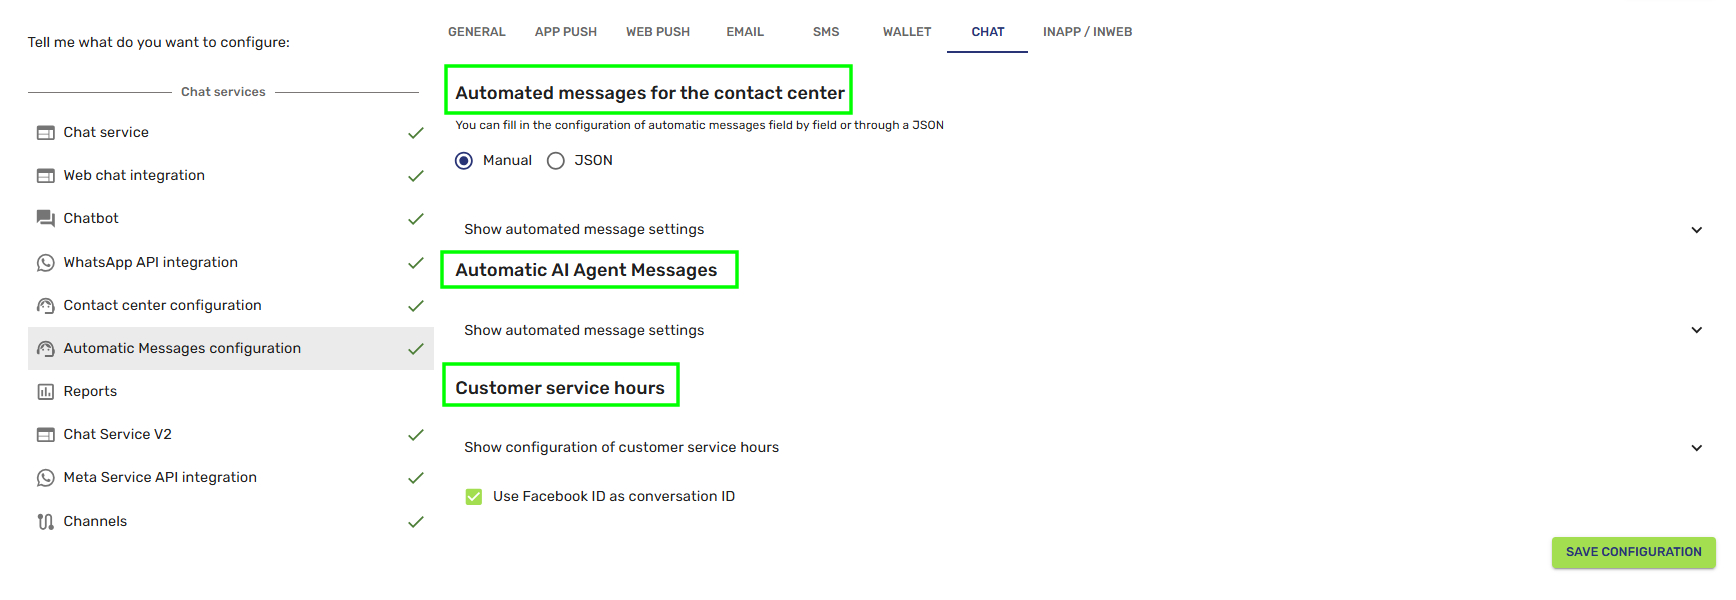
1. Automated messages for the contact center
The Automated messages for the contact center section allows you to define how the system communicates with users during key moments of the support journey. You can configure these responses using two primary methods:
- Manual: Select this option to fill in each message field individually using the provided interface.
- JSON: Select this option to input your instructions directly via a code field, which is ideal for advanced configurations or bulk updates.
Customizable Notification Triggers
You can set up specific notifications to keep users informed during the following events:
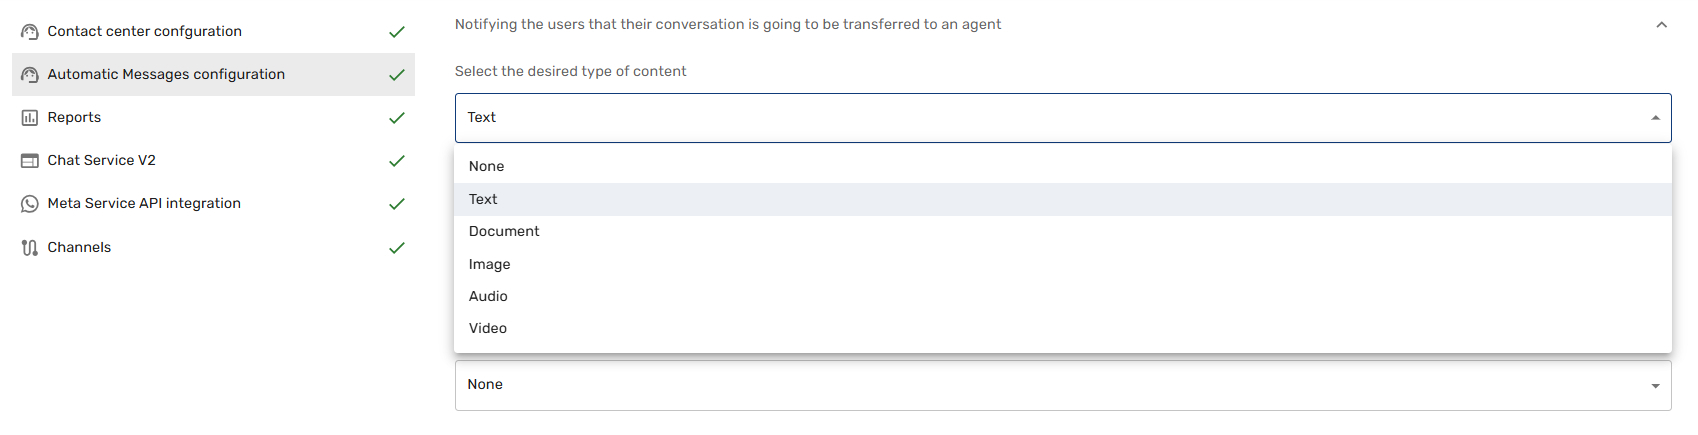
- Initial Transfer: Notify users when their conversation is being moved to a support agent.
- Assignment: Inform users once an agent has successfully been assigned to their chat.
- Reassignment: Alert users when their session is being transferred to a different agent.
- Assignment Failure: Notify users if the system is unable to find an available agent.
- Transfer Success: Confirm that a transfer to a live agent was completed successfully.
- Transfer Failure: Alert users if a move to another agent could not be completed.
- Automatic Closure: Notify users when a session ends automatically due to inactivity or system rules.
- Agent Closure: Inform users when an agent manually ends the conversation.
Multi-Media Support
For every field mentioned above, you have the flexibility to choose the type of content the user receives:
- Available Formats: None (no message), Text, Document, Image, Audio, or Video.
2. Automatic AI Agent Messages
The Automatic AI Agent Messages section provides granular control over how your Generative AI assistant communicates during specific system events. This ensures that even when the bot encounters technical limitations or specific triggers, it maintains a professional and consistent brand voice.
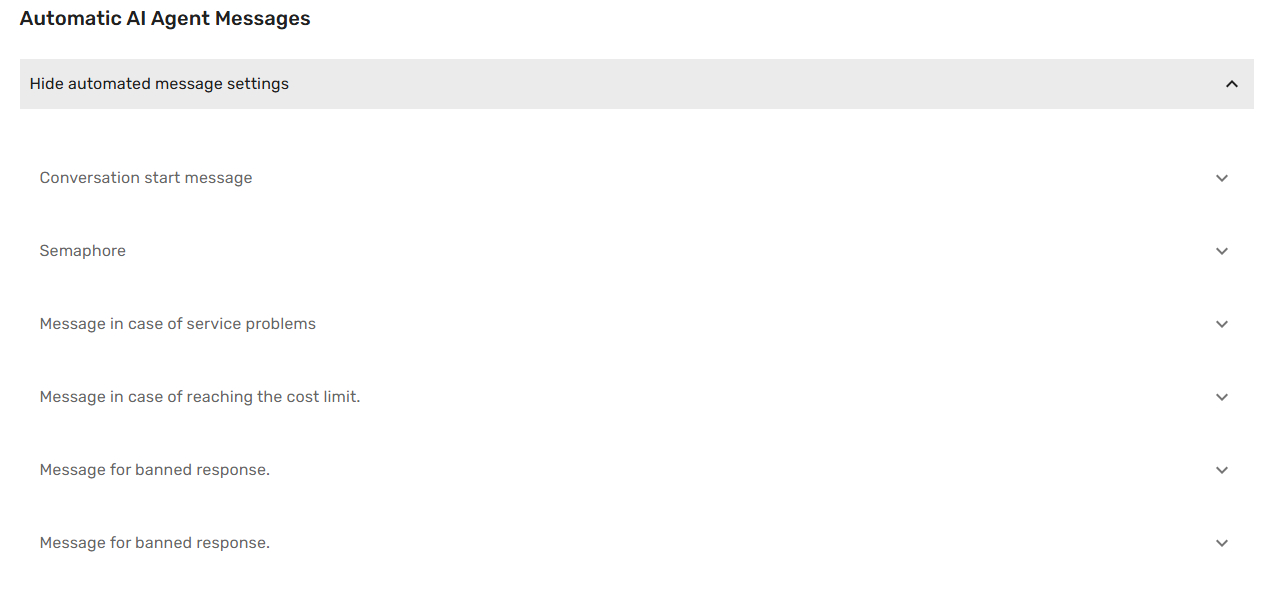
Response Categories
You can expand the settings to customize the following automated triggers:
- Conversation start message: The initial greeting sent when a user first interacts with the AI agent.
- Semaphore: Technical response settings used to manage flow control during high-traffic or processing intervals.
- Message in case of service problems: A fallback message delivered if the AI service encounters a technical error or downtime.
- Message in case of reaching the cost limit: An automated notification sent if the project’s predefined API expenditure threshold is met.
- Message for banned response: The specific reply given when a user’s query triggers the Input Blacklist or if the bot is prevented from using terms in the Output Blacklist.
Multi-Media Content Options
For each of these categories, you are not limited to plain text. You can select the specific type of content that best fits your communication strategy:
- Available Formats: None (no message), Text, Document, Image, Audio, or Video.
3. Customer Service Hours
The Customer Service Hours section allows you to define exactly when your contact center is operational. Setting these hours ensures that automated out-of-office messages are triggered correctly when users reach out to your business during non-working times.
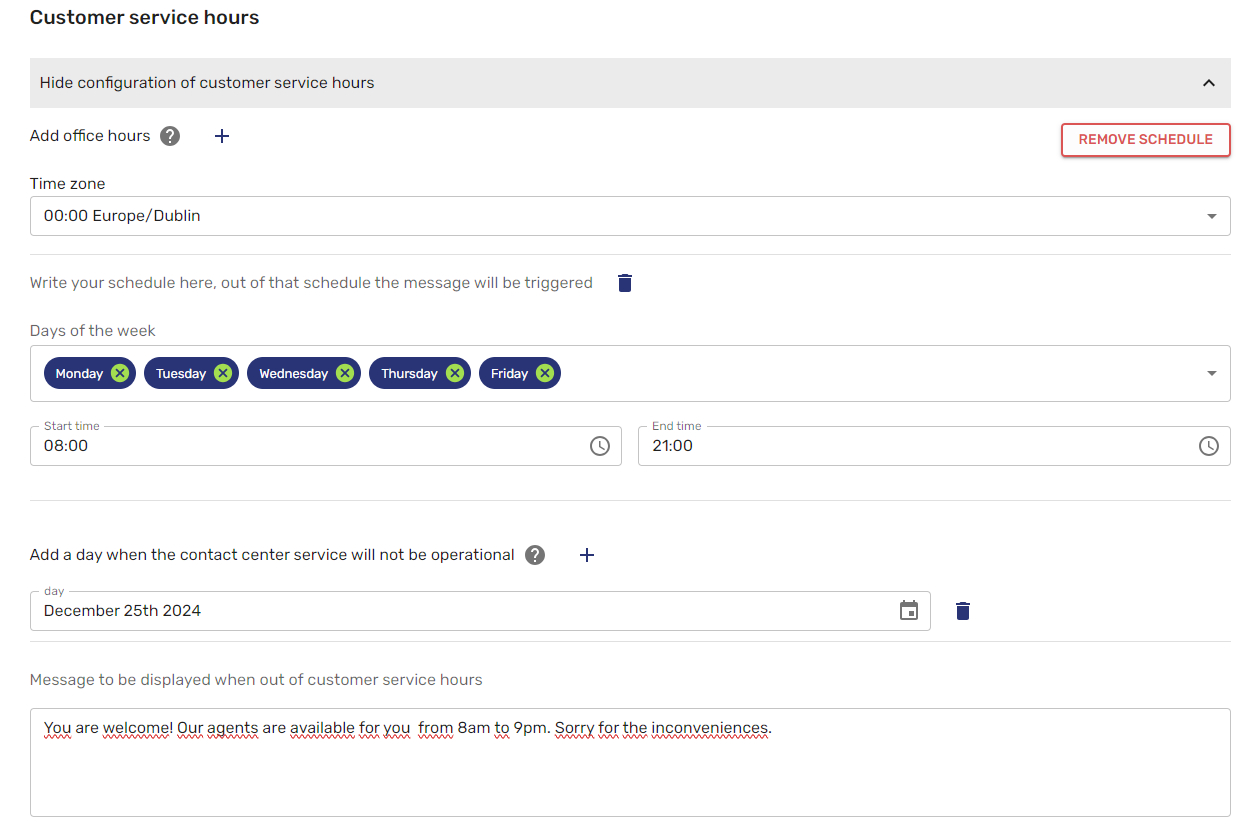
Configuring Your Schedule
You can create a highly customized availability plan using the following tools:
- Time Zone: Select your local time zone (e.g., +00:00 Europe/Dublin) from the dropdown menu to ensure the schedules align with your team's actual location.
- Office Hours Blocks: You can add multiple schedule blocks to cover different shifts or split days. For each block, you can select:
- Days of the week: Choose specific days (e.g., Monday through Friday).
- Time Range: Set the start and end times for those specific days (e.g., 08:00 to 21:00).
- Weekend/Special Shifts: You can add a separate block for days with reduced hours, such as Saturdays (e.g., 09:00 to 14:00).
Non-Operational Days (Holidays)
To account for specific dates when the service will be closed regardless of the weekly schedule:
- Add a Day: Use this feature to select specific calendar dates (e.g., January 1st, 2027) when the contact center service will not be operational.
Facebook ID
It is possible to use the Facebook ID of the user to identify the conversation as a conversation ID.

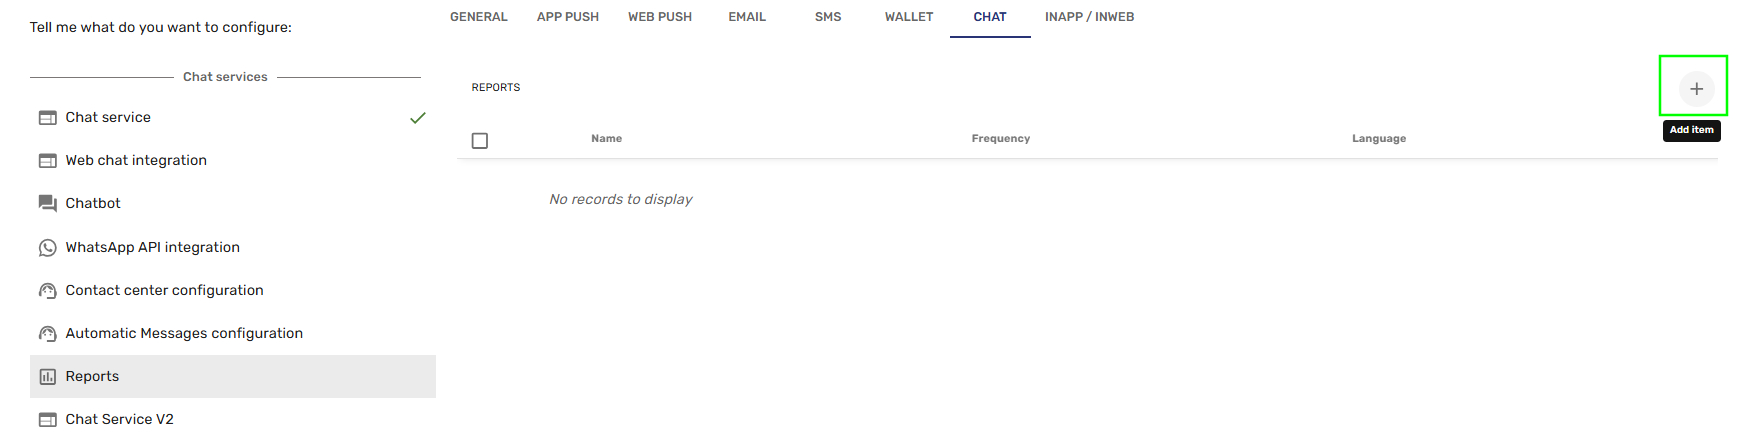
Reports
The Reports section provides a comprehensive overview of your communication performance, allowing you to monitor and analyze activity across your chat channels. This module enables you to automate the delivery of key metrics directly to your team's inbox.
Managing Your Reports
The main dashboard displays all currently active reports:
- Report List: View the name, delivery frequency, and language for each scheduled report.
- Add New Report: To set up a new automated data export, click the "+" (Add item) button located in the top right corner of the interface.
Creating a Custom Report
When you choose to create a new report, a configuration window will appear with the following options:
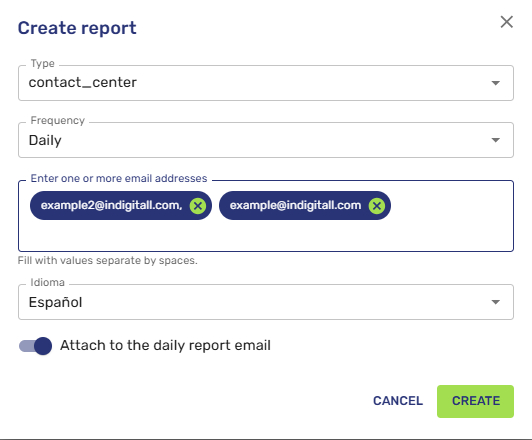
- Type: This field automatically displays the name of your specific Contact Center to identify the data set you will analyze.
- Frequency: Currently, reports are generated on a Daily basis to ensure you have the most up-to-date metrics.
- Email Destinations: Enter one or more email addresses to receive the reports. The interface allows you to add multiple recipients by separating addresses with spaces.
- Language: Choose the preferred language for the report content. The available options are Spanish, English, and Portuguese.
- Email Attachment: Use the toggle to confirm if you want the data file to be attached directly to the delivery email.
Click the green "CREATE" button at the bottom right of the configuration window to save your settings.
Chat Service V2 Integration
The Chat Service V2 Integration section provides updated infrastructure for managing high-volume messaging campaigns. This version includes enhanced delivery controls to optimize how your system handles large-scale notifications.
To activate this updated service, you must manage the primary integration toggle:
- Chat Service V2 integration: Use the main switch to set the service to Enabled. This activates the V2 framework for your project.
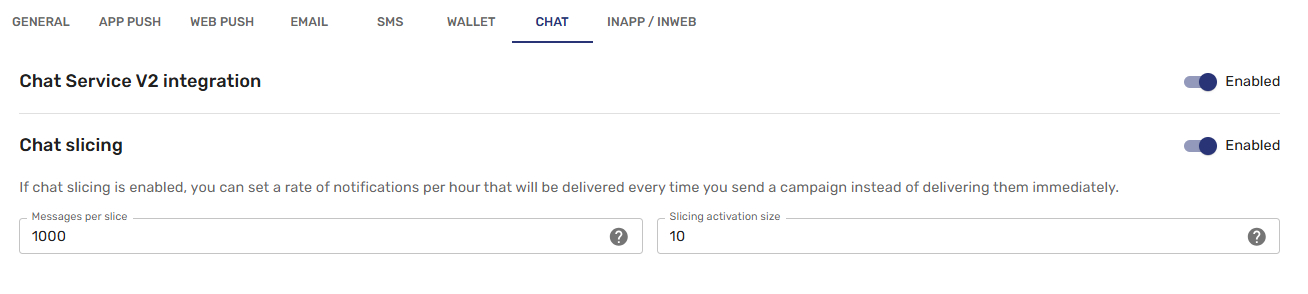
Chat Slicing
The V2 integration features a specialized Chat slicing mechanism. When enabled, this tool allows you to stagger the delivery of your notifications rather than sending the entire campaign at once. This is highly recommended for managing server load and inbound traffic to your support team.
You can customize the slicing behavior through the following fields:
- Messages per slice: Define the specific number of notifications that will be delivered in each hourly interval (e.g., 1000).
- Slicing activation size: Set the minimum campaign volume required to trigger the slicing process (e.g., 10). Campaigns smaller than this number will be sent immediately.
Meta Service API Integration
The Meta Service API Integration section allows you to manage the official connection for Meta-owned messaging platforms, such as WhatsApp. This module is designed to help you monitor usage limits and ensure your integration remains active and validated.
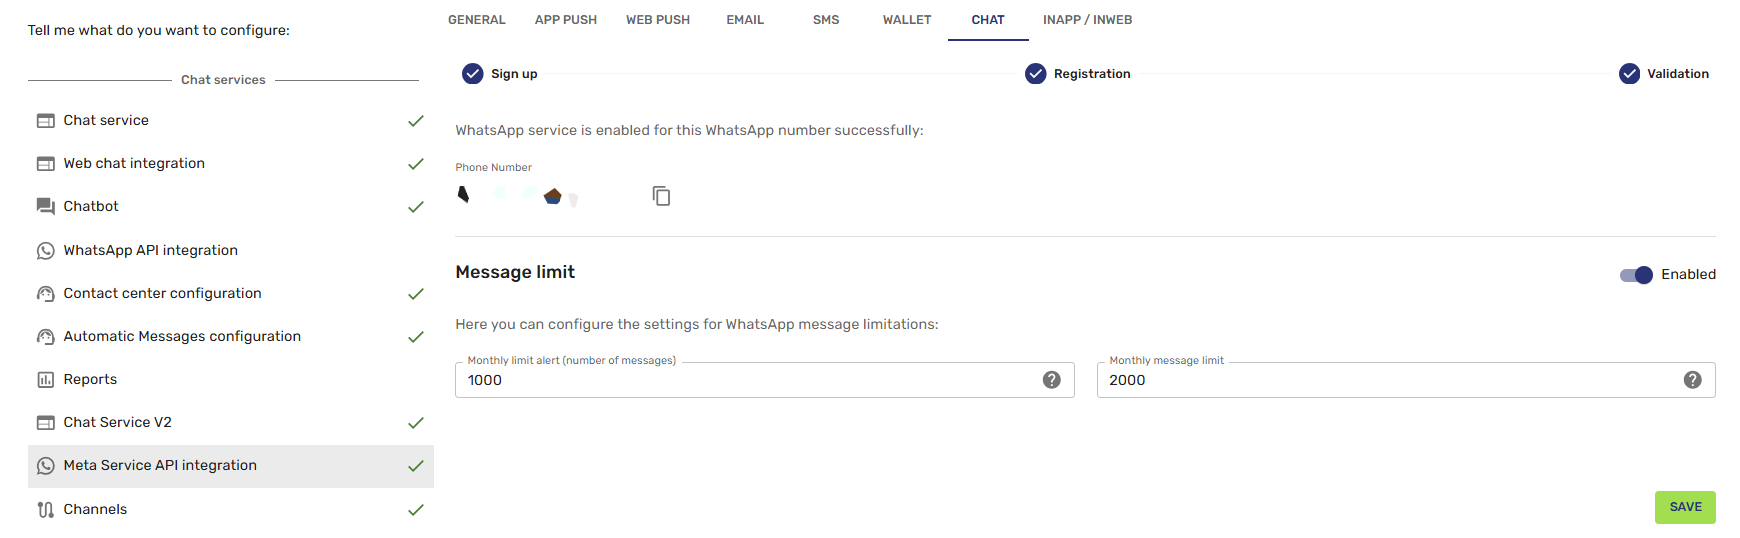
Integration Status
At the top of the section, you can track the real-time status of your official Meta connection:
- Validation Milestones: The interface displays the current status of the Sign up, Registration, and Validation phases. A blue checkmark indicates that the step has been successfully completed.
- Service Confirmation: A confirmation message will appear once the service is successfully enabled for your specific phone number.
- Phone Number: The registered number associated with this Meta integration is displayed here for easy reference.
Message Limit Configuration
To help you manage costs and messaging volume, you can configure specific thresholds:
- Message Limit Toggle: Use this switch to Enable or disable global limitations on your messaging campaigns.
- Monthly Limit Alert (number of messages): Define the threshold at which the system should send a notification alert (e.g., 1000 messages).
- Monthly Message Limit: Set the absolute maximum number of messages that can be sent through this integration per month (e.g., 2000 messages).
Channels
The Channels section serves as your overview and management center for all active communication methods within your project. This module allows you to quickly verify which specific APIs or services are operational and gives you the flexibility to expand your connectivity.
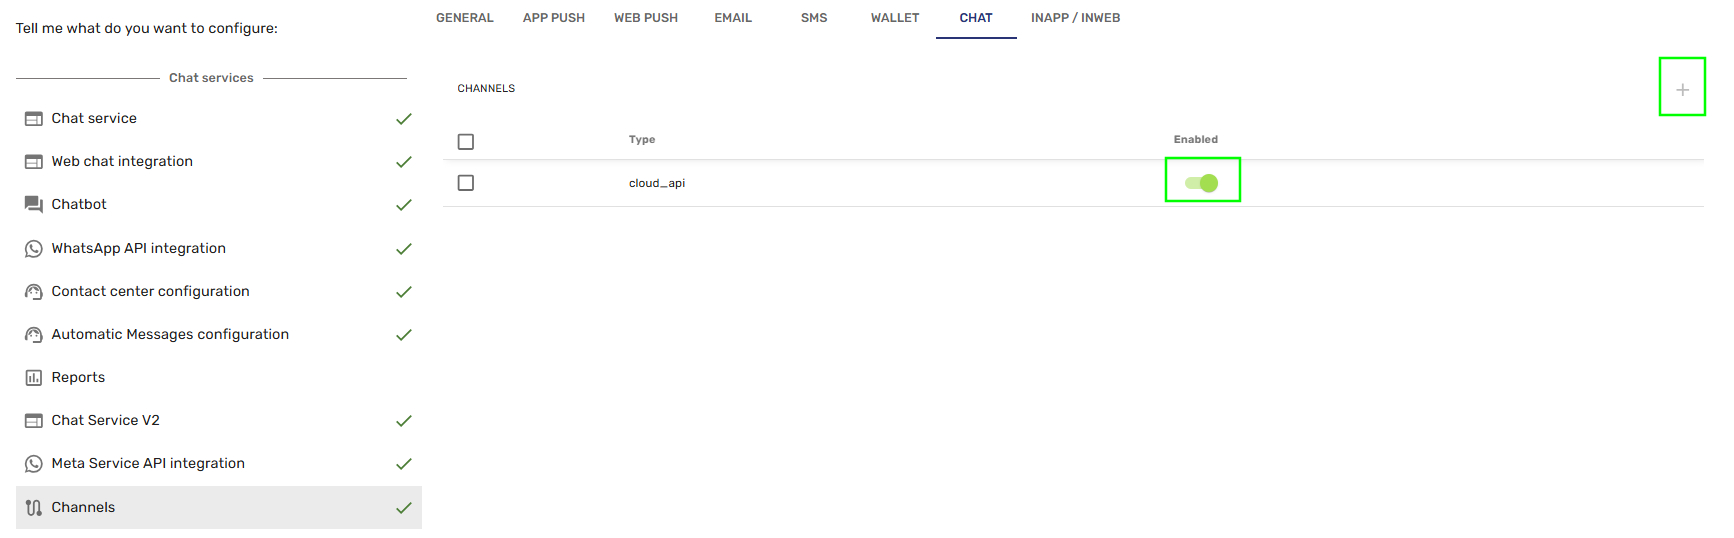
Managing Your Active Channels
The dashboard provides a clear list of your current integrations:
- Channel List: Displays the Type of each service currently configured (e.g., cloud_api).
- Status Toggle: Use the green Enabled switch to instantly activate or deactivate a specific channel.
- Add Channel: Click the "+" (Add item) button located at the top right of the channel list to initiate the setup for a new communication type.
Updated 6 months ago