
Webhook
A webhook is an automated, real-time message sent between applications when a specific event occurs. For marketing and operations teams, webhooks are powerful tools that connect your customer journeys across multiple platforms, allowing you to respond instantly to user actions on their preferred channels.
Instead of relying on manual batch updates or delayed system syncs, webhooks act as real-time triggers. When a customer performs an action on one channel, a webhook instantly alerts another system or service to trigger a timely, automated action on a completely different channel.
Real-World Marketing Examples
- Automated Voice Reminders (Medical Appointment): A patient schedules a doctor's appointment. As the appointment approaches, a webhook triggers an automated phone call bot to ring the patient with a voice reminder. The patient can confirm or reschedule directly during the call, significantly reducing no-shows and keeping schedules optimized.
- Value Creation & Retention (Booking to WhatsApp): A guest books a two-night stay at your hotel. A webhook automatically triggers a WhatsApp message containing curated travel tips and local recommendations. This delivers instant value, enhances the guest experience, and helps reduce booking cancellations.
Webhooks Dashboard
In the main navigation menu, go to Tools > Customer Journey > Webhooks.

The dashboard displays a comprehensive list of all your active and draft webhook templates. You can easily locate specific configurations using the built-in search and sorting tools:
- Search Bar: Enter keywords into the search box at the top right to filter templates by name or target URL.
- Order by Dropdown: Sort your templates using the following criteria:
- By Date: Descending date (newest first) or Ascending date (oldest first).
- By Name: Name A-Z or Name Z-A.
- By ID: descending ID or Ascending ID.
Creating a New Webhook
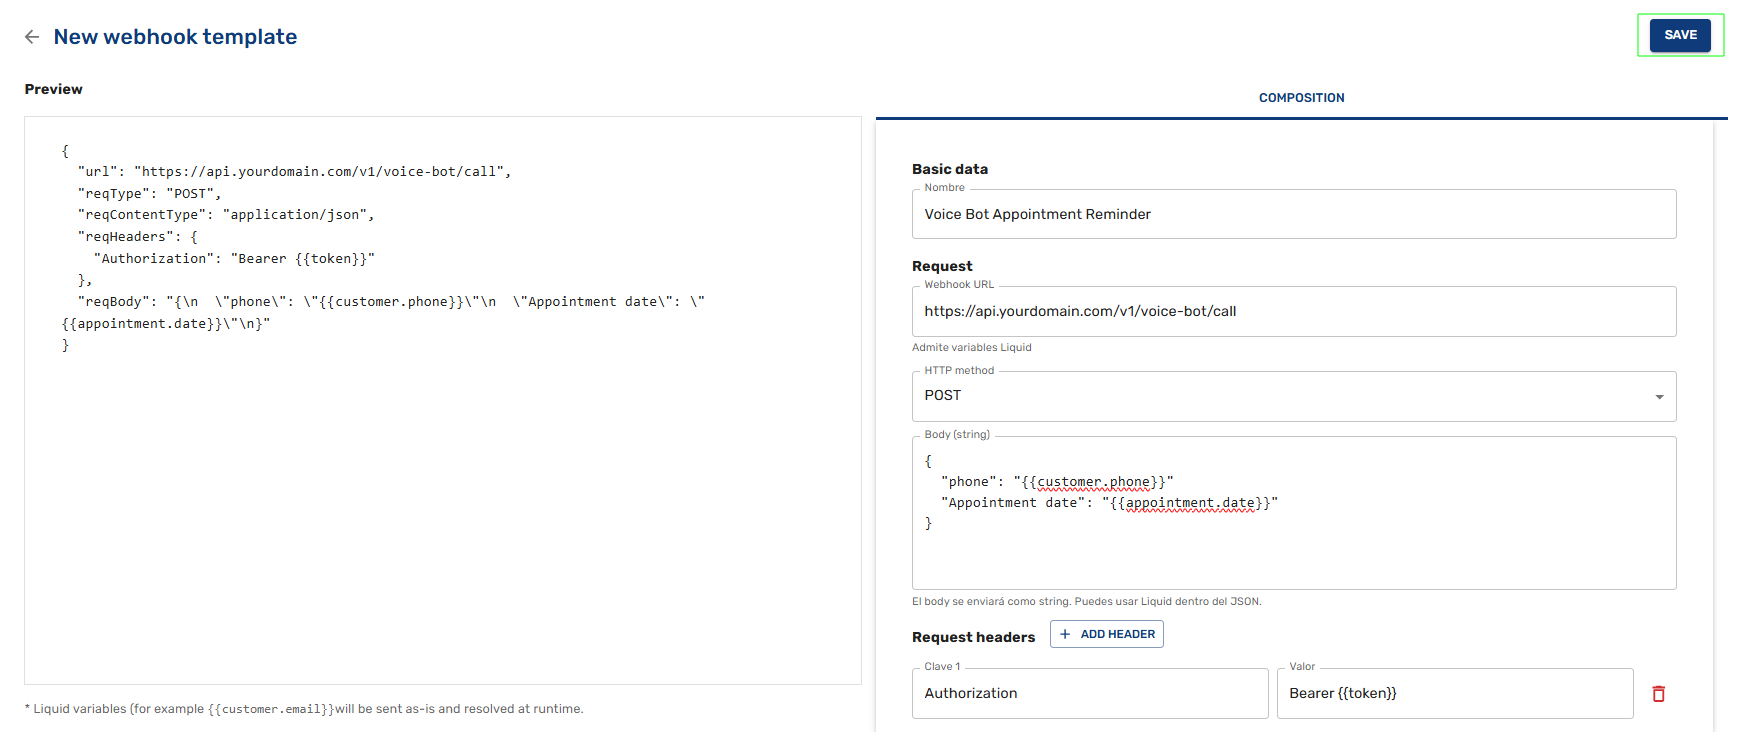
To set up a new integration endpoint, click the green NEW WEBHOOK TEMPLATE button in the top-right corner of the dashboard, then fill out the composition form:
Step 1: Basic Data
In the Composition section on the right, define your template identity:
- Name: Enter a clear, descriptive name (e.g., Trigger Voice Bot Appointment Reminder). This field is required.
Step 2: Request Configuration
Set up the HTTP request details under the Request section:
- Webhook URL: Enter the destination endpoint URL (e.g., https://api.yourdomain.com/v1/voice-bot/call). This field is required.
- HTTP Method: Select the appropriate HTTP method required by your destination endpoint (e.g., POST, GET, PUT).
- Body (String): Define your JSON payload. You can include dynamic Liquid variables (such as {{customer.phone}} or {{appointment.date}}). Liquid variables are preserved during configuration and resolved automatically at runtime when the event triggers.
Step 3: Request Headers (Optional)
If your target platform requires custom authentication keys or metadata:
Click the + ADD HEADER button.
Specify the header key and value (e.g., Authorization: Bearer {{token}}).
Step 4: Preview and Save
- Preview Panel: Review the Preview pane on the left side of the screen to inspect the generated JSON structure.
- Save: Click SAVE in the top-right corner to activate your new template for use inside your Customer Journeys.
Updated 3 months ago