
Creating a Push Message
API
There are three ways to create push notifications:
- AI Text Assistant: Creation of content through generative AI. Creating campaigns in seconds and in any language. Here’s the full explanation.
- Campaign from URL: Creating the push notification based on the entered web address.
- New Campaign: Creating manually the notification.

A campaign represents the components of a notification: text, emojis, images, logos, destination URLs, and more.
Campaigns can be saved, edited, deleted, and sent at any time.
In the first field, you can enter a descriptive name for your campaign, and on the right, select the platforms where it will be sent (Android, iOS, web).

Below, you will find three options:
- Campaign: This is where you configure the visual content, layout, and behavior of the notification. You can also optionally add buttons.
- Filters: Apply filters to segment the audience that will receive the communication. Options include interest groups, geographic filters, device types, and more.
- Delivery Methods: Choose how the campaign will be sent and how long it will remain active. You can send it immediately, schedule it for later, have it trigger automatically when a user registers (welcome), or when they approach a point of interest (geofencing), among other options.
At the bottom of this screen, you can always see how many devices your campaign will reach. If you apply any of the available filters, this impact counter will update in real time.

Campaign
In campaign you will find the main elements to build your notification: title, body, icon, image, buttons, etc.
Title and content
Choose a title and body of the message for the notification.
Use words that call for user action and tap on the notification.
Category
The categories are used to group and classify campaigns of the same theme or objective.
To use them, you must create them first from the side menu of the console:
For example, you can create a new products category to categorize campaigns related to new products.
When you need to filter only by new products campaigns, you can do it easily by searching for this category.
Emojis
You can add emojis in the title or body of the notification you want to send. Press and unfold the smiley icon to the right of the text box, and choose the emoji you want to use.

Images
Important
- The images are stored on our server, so you don't have to worry about hosting the image.
- Don't forget that multiple images can be uploaded to create an animated GIF.
Format recommendations:
Icon:
- Resolution 128x128px
- Weight about 30KB
- Recommended format jpg 30%
Image:
- Resolution 500x250px (500x500px for iOS)
- Weight about 100KB
- Recommended format jpg 30%
When you add an image to the notification, the image cropping tool will open. You can decide if you want to make two cuts: one panoramic for Android / web, and another square for iOS. In case of making a single crop, the panoramic format will be used for all platforms.
Actions
The actions are triggered when a user clicks on the notification: open web, open app, phone call, install application or share on social networks.
In web push notifications, only the open web action is allowed.

- Open web: when the user clicks on the notification, the browser will open, which will load the specified URL. It works for UTM links.
- Open app: when the user clicks on the notification, the application will open. If the deeplink field is not completed, the application will open to the main screen.
- Phone call: when the user clicks on the notification, a phone call will be launched to the specified number.
- Install application: when the user clicks on the notification, GooglePlay / AppStore will open with the details of the specified application. Remember that you have to provide the app ID for both stores.
- Share on social networks: when the user clicks on the notification, the dialog box will open to share the specified URL.
Subscribe to segments
Segments are interest groups that you can create to segment your audience. That is, impacting certain devices that have subscribed to your notifications in a personalized way.
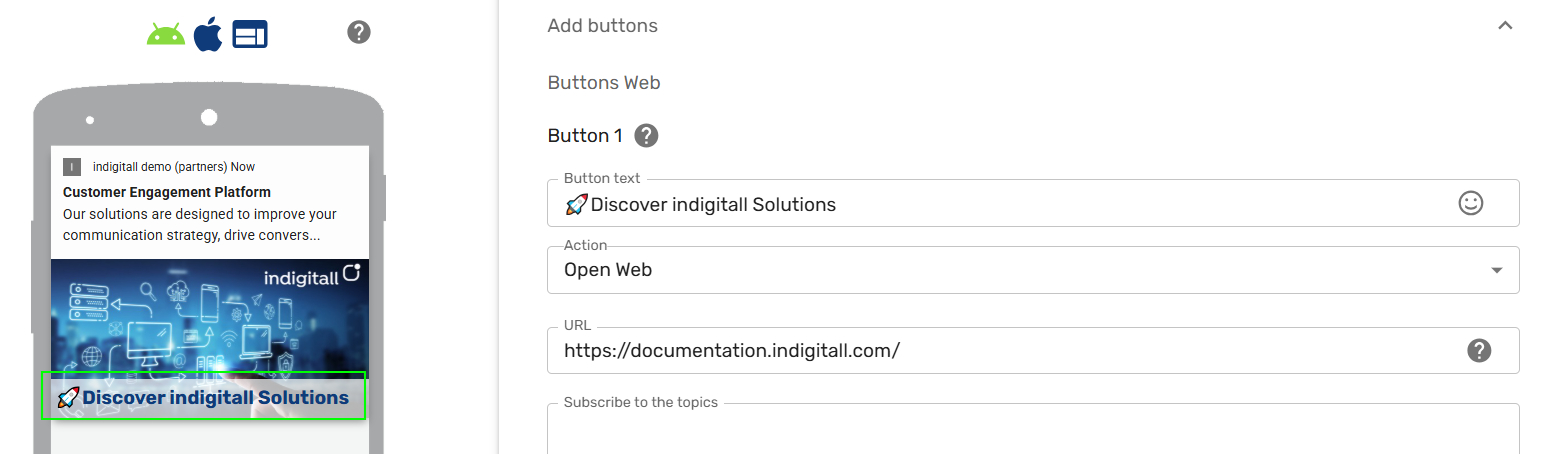
Notification buttons
Add a label and define the action triggered when the button is clicked:
- Button text: Enter the text and emojis to display.
- Action: Select the action to be triggered.
- URL: The web address to open.
- Subscribe to the topics: Choose the segments to subscribe users who click the button.
Available on desktop and all devices, except Android version 13 and above.
Advanced
In the Advanced area, we have several optional parameters:
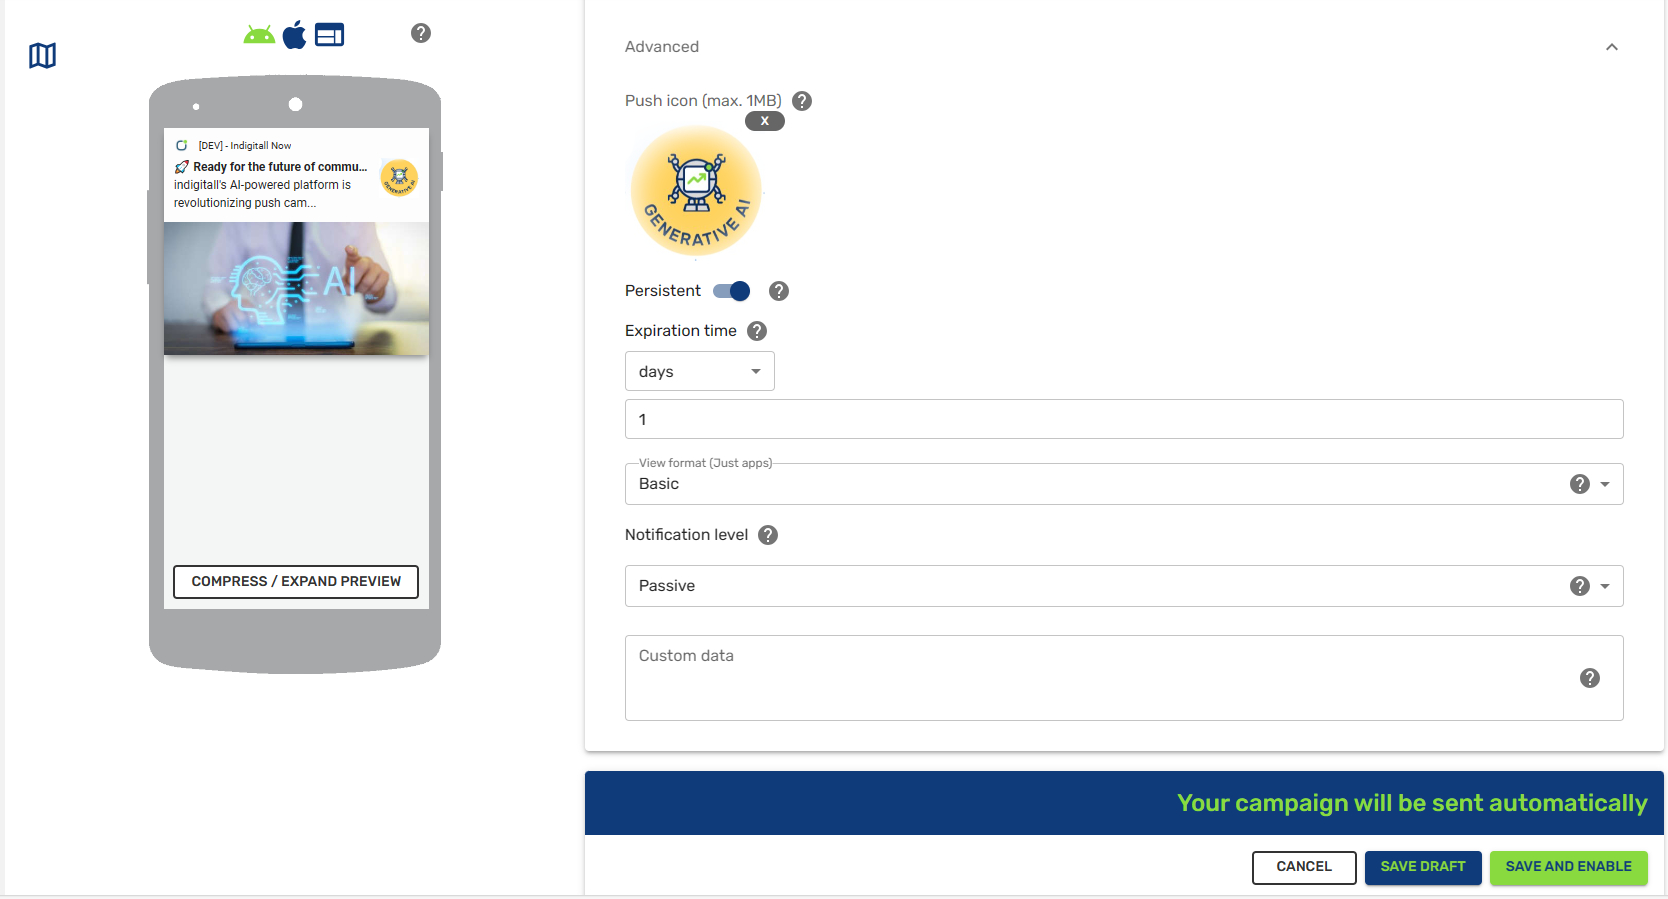
- Push icon: By default, the image you have included in the web project or in the application will always appear in the icon (small image). If you want to change this image for the specific campaign you can select and crop a new image in format jpg or png; we recommend a size of 200x200 pixels and approximately 250Kb.
- Persistent: This only applies for web push and sendings for computers. In the case of computers, you can decide if the notification disappears after 5 seconds, going to the Windows notifications inbox, and, in the case of selecting persistent for this campaign, it will remain fixed on the screen until the user clicks on it or discards it. This does not apply to Android smartphones.
The persistent field is only valid for the web platform. If you send a notification as persistent, the notification will remain on the desktop until the user interacts with it, either by clicking or deleting it.
- Expiration time: It allows you to specify how long to retry to hit those users who do not have connectivity.
- View format: There are 3 options . This property only affects how the Android compressed notification is displayed.
Basic: the text will be displayed on all screens.
Half screen: the text will be displayed on the left half and the image on the right half.
Full screen: the entire notification is an image.
- Notification level: It is possible to specify a system with a defined interruption level for each notification. The system uses this interruption level to determine when to deliver the alert.
Passive: The most usual level for marketing notifications. These notifications can be read at any time.
Active: Interesting information for the user. For example, the score of a game.
Time sensitive: Important information for the user. For example, an account security issue or a package delivery.
Critical: Urgent information about personal health and public safety. These notifications are very rare and generally come from government authorities.
- Custom data: It is metadata that travels with the push but cannot be seen by the user. It is useful to implement custom logic in your app, passing parameters through this field.
Filters
With the filters you can segment to whom to send notifications in a personalized way.
Choose the country or region, if they are users who have not entered your website or app for a long time, or by the type of device that subscribed to your notifications.

Filters affect the number of devices that will receive the final notification.
Exception
In the case of campaigns that are sent automatically, the counter will not show a result of the number of devices to which it will be sent.
Segments / Topics
- Devices subscribed to: the campaign will be sent to devices that are subscribed to a specific topic.
- Devices that are not subscribed: the campaign will be sent to devices that are not subscribed to the specific topics.
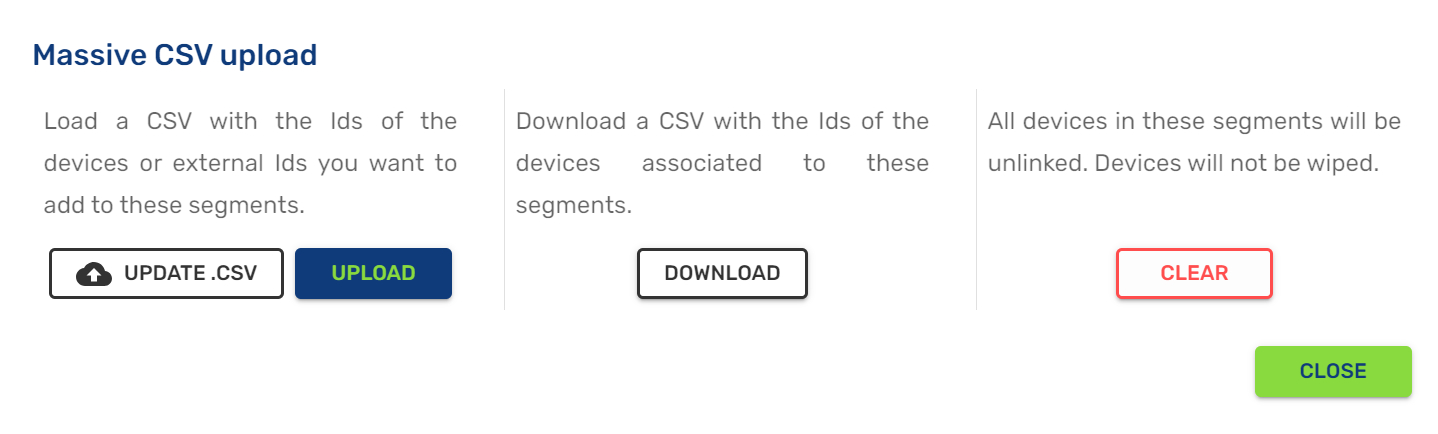
Moreover, you can edit the devices linked to topics to add or remove them uploading a .CSV file with their identifiers (devideId).
External Applications
Send campaigns to devices that have applications such as Facebook, Twitter or Spotify installed.
Warning
This option is only available for mobile applications, not for web.
Thanks to this tool, you will be able to detect the applications that your users have installed on their smartphones and tablets.
When you send a campaign you can choose that it only impacts users who have a certain app installed.

To start capturing this information from your users, you will have to specify the list of applications that you want to be verified.
When you click on create a new external application, you can choose an application from the popular list or specify the identifier of any other app.
List of devices
Using push notifications (Web Push and App Push), we need to have the identifier for each device (deviceId) as a mandatory field . You can upload a .CSV file with this field (see example).
deviceId
6abcf613-e4e6-xxxx-a5d1-9533fe655e61
69b26254-aacd-xxxx-98c3-525fc7bff440
89b99158-2144-xxxx-b1df-d298649f934b
...

You can also use your own identifiers (for example, email, user ID in your CRM, etc) to create the list in .CSV. In this case, you must load the .CSV file with externalId as header (first line) and your identifiers in each of the other lines.
externalId
[email protected]
[email protected]
[email protected]
...
If you choose to use variables in your messages, remember to include those values in the .CSV file you upload. You’ll find a detailed explanation here.
Please go to this page to see how to associate the device with a user through SDKs.
Geographic filters
This filter allows you to send geolocated notifications. You will send the campaign to the devices that are within the specified areas.
You can manage your areas from the indigitall console, selecting from the left menu: Tools >AppPush/WebPush >Manage areas.
You can manage your areas from the indigitall console, selecting from the left menu: Tools >AppPush/WebPush >Manage areas.
It is possible to create and delete the areas of any of your projects.
There are two ways to create your list of areas:
- Drawing them on the map
- Loading a file with the list of areas
To load a file that contains the information of all the areas, click on Load CSV . The file format must be CSV, with the header: name, geom, tags.
The geom column will be the coordinates of each of the vertices that make up the polygon.
Example:
| name, geom, tags |
|---|
| "Algete",-1.723579 3.723579|-2.476532 6.476532|-2.789804 6.789804|-2.916212 6.916212,"Village, Madrid" "Alcobendas",-1.723579 3.723579|-2.476532 6.476532|-2.789804 6.789804|-2.916212 6.916212,"Town, Madrid" "Alzira",-1.723579 3.723579|-2.476532 6.476532|-2.789804 6.789804|-2.916212 6.916212,"Town, Valencia" "Silla",-1.723579 3.723579|-2.476532 6.476532|-2.789804 6.789804|-2.916212 6.916212,"Village, Valencia" |
To view an area that you have previously created on the map, select it from the list on the left.

Frequency of use
This option allows you the possibility of sending the campaign to devices that have not visited the application in a certain period of time. Also to users who have done so.

Type of device
When you use the device type filter, this option will allow you to select between mobile phone, tablet and desktop computer. You can also select in which browsers you want your campaign to be shown (Safari, Opera, Edge, Firefox, Chrome).

Sending Options
Choose what type of shipment you want to make.
- Immediate - the campaign is sent as soon as you press the send button.
- Scheduled - select when to send your campaign.
- Best Moment - this module of Artificial Inteligence sends the messages at the best time for each user.
- Welcome - automate the sending of notifications for users that your subscriptions are accepted and forget about doing it manually.
- Fidelity - automate how much time has to elapse without a user accessing your web / app to send a reminder.
- Retargeting automates the sending of notifications when your users trigger an event. You can find more information about remarketing here.
- Recurrent - automates the sending of recurring notifications. You can find more information about recurrent here.
- Journey - the purpose of the campaign will can be used for the creation of cross-channel Journeys

Updated 6 days ago