
What do you need for integration?
- An account to access into indigitall console. If you don't have it, please contact with us.
- The next thing is to have a project associated with the application web (web browsers) and / or mobile (android, iOS). See more details here.
It is important since the project contains the configuration data of your application, that is, the domain where your website is hosted, the safari or iOS certificates or the firebase key that android uses. It all depends on the platforms (web or app) that the project uses.
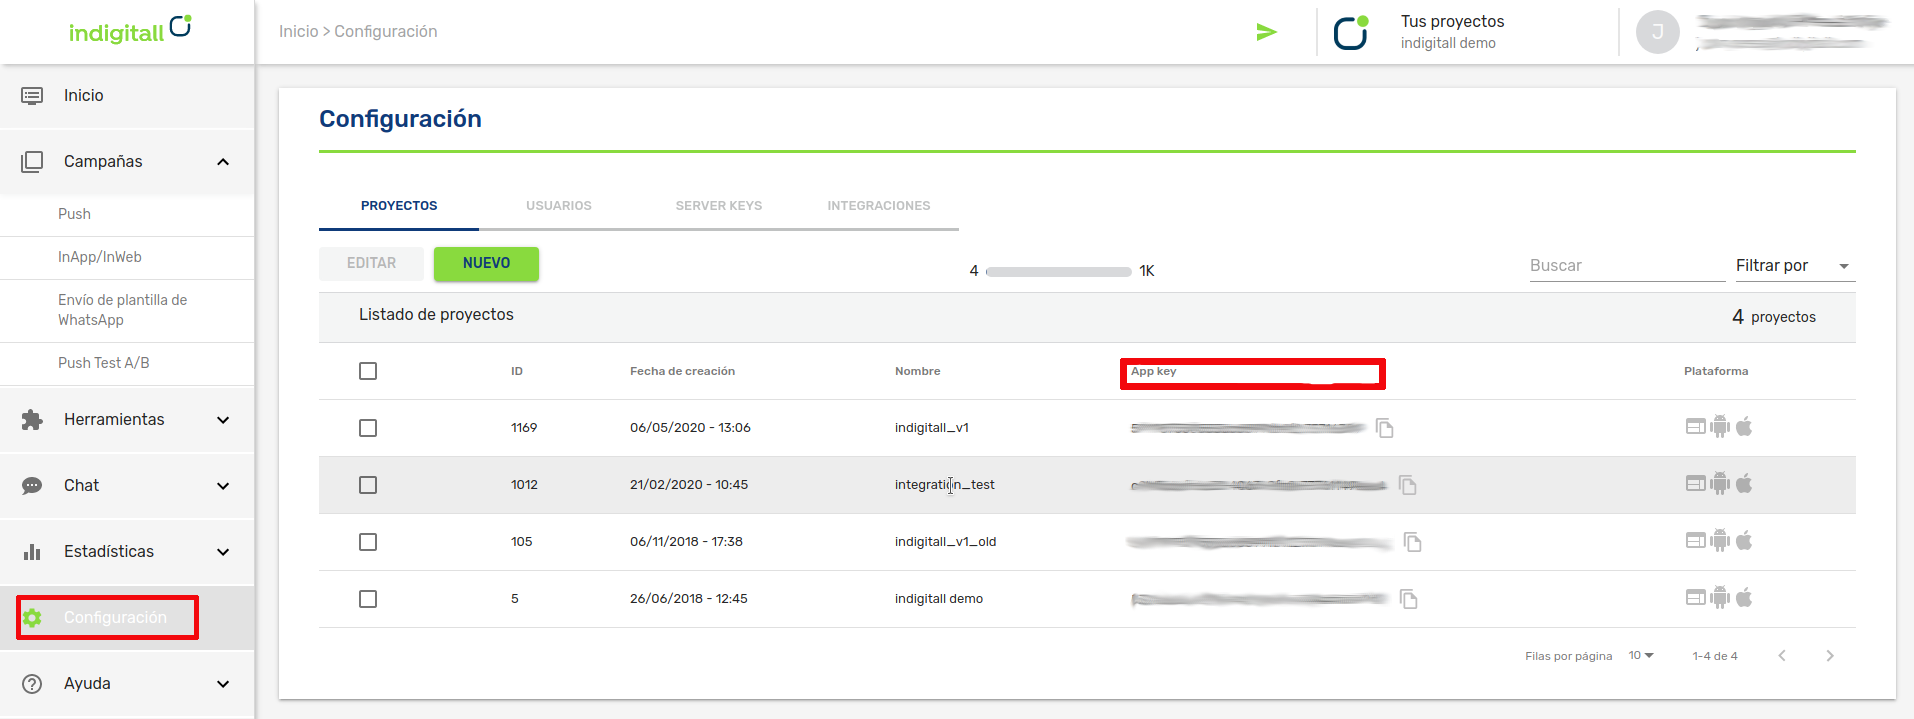
- You will need the App Key of the project, which is the key that our system uses to identify it, so it is unique for each project. You can find it in the administration console within the Configuration section in the Projects tab. You can see it in the following image, and to copy it, it is easy to click on the icon next to the key (App Key)
- For android
- A Firebase Server Key
- A HMS Push Kit Server Key
- Android Studio
- An Android device or emulator with Google Play services installed to run the app
- For iOS
- A valid push certificate for iOS. Learn how to get the push certificate from APNS
- Xcode
- An iOS device to run the app
Integration
This article shows the minimum development that must be done to start registering devices and being able to carry out the first push campaigns.
The Indigitall SDK is compatible with Google messaging services, through the Firebase platform and with the services of HMS or Huawei Mobile Services of Huawei .
You can see it in this tutorial video or read the instructions below:
🤖 Click to expand AI Integration Prompt (ChatGPT / Copilot / Claude)
Copy and paste this prompt into your AI assistant to accelerate your integration:
---
mode: agent
description: Complete integration guide for the indigitall-capacitor-plugin push notifications SDK in Capacitor projects (Android + iOS + optional HMS).
---
# Push Notifications SDK Integration: indigitall-capacitor-plugin
You are an expert in integrating the `indigitall-capacitor-plugin` for Capacitor. Your mission is to guide the client step by step to integrate push notifications into their app, gathering the necessary information, modifying the correct files, and verifying dependencies and permissions.
## Step 0 — Gather client information
Before doing anything, ask the client for the following data. Wait for their response before continuing:
1. **appKey** — Application key provided by indigitall (UUID format, e.g. `xxxxxxxx-xxxx-xxxx-xxxx-xxxxxxxxxxxx`).
2. **senderId** — Firebase Cloud Messaging Sender ID (numeric, e.g. `34542366546`).
3. **Private cloud?** — If yes, also request the `urlDeviceApi` (e.g. `https://device.mycompany.com`).
4. **Location support?** — `requestLocation` (boolean: `true` / `false`). If `true`, additional permissions must be added on Android and iOS.
5. **Huawei HMS support?** — If yes, verify the client has the `agconnect-services.json` file and the Huawei AppID.
6. **Push data reception** — In which screen or class do you want to receive push notification data? Provide the component/page name where `Indigitall.onIndigitallGetPush(...)` should be registered.
---
## Step 1 — Install the npm package
```bash
npm install indigitall-capacitor-plugin
npx cap sync
```
Verify that `indigitall-capacitor-plugin` appears under `dependencies` in `package.json`.
**If the client uses HMS**, also install the HMS plugin:
```bash
npm install indigitall-hms-capacitor-plugin
npx cap sync
```
Verify that `indigitall-hms-capacitor-plugin` also appears under `dependencies` in `package.json`.
---
## Step 2 — SDK Initialization (TypeScript / JavaScript)
In the app entry point (e.g. `app.component.ts`, `tab1.page.ts`, or similar), add:
```typescript
import { Indigitall, LogLevel } from 'indigitall-capacitor-plugin';
// Call during app startup (Platform.ready in Ionic, ngOnInit, etc.)
Indigitall.init({
appKey: "YOUR_APP_KEY", // Replace with the client's value
senderId: "YOUR_SENDER_ID", // Replace with the Firebase Sender ID
logLevel: LogLevel.DEBUG, // Use LogLevel.INFO or LogLevel.WARNING in production
// Optional based on client answers:
// requestLocation: true,
// urlDeviceApi: "https://device.yourdomain.com",
}, device => {
console.log("Device init OK:", JSON.stringify(device));
}, (error) => {
console.error("Indigitall init error:", error.message);
});
```
> **Note:** `LogLevel` is available as an enum: `DEBUG=1`, `INFO`, `WARNING`, `ERROR`.
### 2.1 — Push data reception (`onIndigitallGetPush`)
In the screen or class indicated by the client, register the push data listener:
```typescript
import { Indigitall } from 'indigitall-capacitor-plugin';
// Place this in the lifecycle hook of the indicated component (e.g. ngOnInit, ionViewDidEnter, useEffect)
Indigitall.onIndigitallGetPush(async push => {
console.log("PUSH onIndigitallGetPush: ", JSON.stringify(push));
}, (error) => {
console.log("ERROR onIndigitallGetPush: ", error);
});
```
> **Note:** Register this listener only once to avoid duplicates. If using Angular/Ionic, place it inside `ngOnInit` or `ionViewDidEnter` and remove the listener on `ngOnDestroy` / `ionViewWillLeave` if needed.
---
## Step 3 — Android
### 3.1 Verify `google-services.json`
Check that `android/app/google-services.json` exists. If not, the client must download it from the Firebase console for their project.
### 3.2 `android/build.gradle` (project level)
Ensure the Google Services classpath is present, and the Huawei one if HMS is required:
```groovy
buildscript {
dependencies {
classpath 'com.google.gms:google-services:4.4.2'
// If HMS:
// classpath 'com.huawei.agconnect:agcp:1.9.1.301'
}
}
```
### 3.3 `android/app/build.gradle` (app level)
Add at the top (after `apply plugin: 'com.android.application'`):
```groovy
apply plugin: 'com.google.gms.google-services'
// If HMS:
// apply plugin: 'com.huawei.agconnect'
```
And in `dependencies`:
```groovy
dependencies {
implementation 'com.google.firebase:firebase-messaging:25.0.2'
// If HMS:
// implementation 'com.huawei.hms:push:6.11.0.300'
}
```
### 3.4 `android/gradle.properties`
Verify AndroidX is enabled:
```properties
android.useAndroidX=true
android.enableJetifier=true
```
### 3.5 `AndroidManifest.xml` — Receivers, Activity and Services
Inside the `` tag, add:
```xml
```
**If the client uses HMS**, also add:
```xml
```
### 3.6 `AndroidManifest.xml` — Permissions
Verify/add inside `` (outside ``):
```xml
, grantResults: IntArray) {
super.onRequestPermissionsResult(requestCode, permissions, grantResults)
for (permission in permissions) {
if (Manifest.permission.POST_NOTIFICATIONS == permission) {
IndigitallCp.onRequestPermissionsResult(this, 50001, permissions, grantResults)
}
}
}
```
### 3.8 HMS — `agconnect-services.json` file
If the client uses HMS, verify that `android/app/agconnect-services.json` exists, downloaded from the AppGallery Connect console.
---
## Step 4 — iOS
### 4.1 `Podfile`
The `Podfile` must include the Capacitor SDK pod (Capacitor handles this automatically when using `:path`). Verify the entry exists for the main target:
```ruby
target 'App' do
# ...other Capacitor pods...
pod 'IndigitallCapacitorPlugin', :path => '../../../sdk'
# Or if installed from npm:
# pod 'IndigitallCapacitorPlugin', :path => '../../node_modules/indigitall-capacitor-plugin'
end
```
**Add the NSE target** (Notification Service Extension) to enrich notifications. The target name must match what the client creates in Xcode:
```ruby
target 'NSE' do # 'NSE' or whatever name the client gives it
pod 'indigitall-ios'
end
```
Then run:
```bash
cd ios/App
pod repo update
pod install
```
Verify that `indigitall-ios ~> 6.21.0` installs correctly.
### 4.2 Xcode Capabilities
Open the project in Xcode and verify/enable the following capabilities on the main target (`App`):
- **Push Notifications** — Required.
- **Background Modes** — Enable:
- `Remote notifications`
- `Background fetch`
- **If using location:** Enable `Location updates` in Background Modes.
### 4.3 `Info.plist` — Location permissions
**If the client wants location** (`requestLocation: true`), add to `Info.plist`:
```xml
NSLocationWhenInUseUsageDescription
This app uses your location to deliver relevant notifications.
NSLocationAlwaysAndWhenInUseUsageDescription
This app uses your location in the background to deliver relevant notifications.
```
### 4.4 `AppDelegate.swift` (Swift)
Import Indigitall and add the APNS token registration methods:
```swift
import Indigitall
// Inside AppDelegate:
func application(_ application: UIApplication,
didRegisterForRemoteNotificationsWithDeviceToken deviceToken: Data) {
NotificationCenter.default.post(
name: .capacitorDidRegisterForRemoteNotifications,
object: deviceToken
)
}
func application(_ application: UIApplication,
didFailToRegisterForRemoteNotificationsWithError error: Error) {
NotificationCenter.default.post(
name: .capacitorDidFailToRegisterForRemoteNotifications,
object: error
)
}
```
**If the project uses Objective-C:**
```objc
# import
- (void)application:(UIApplication *)application
didRegisterForRemoteNotificationsWithDeviceToken:(NSData *)deviceToken {
[[NSNotificationCenter defaultCenter]
postNotificationName:capacitorDidRegisterForRemoteNotifications
object:deviceToken];
}
- (void)application:(UIApplication *)application
didFailToRegisterForRemoteNotificationsWithError:(NSError *)error {
[[NSNotificationCenter defaultCenter]
postNotificationName:capacitorDidFailToRegisterForRemoteNotifications
object:error];
}
```
### 4.5 Notification Service Extension (NSE)
The NSE enables image attachments and rich notification content. Steps:
1. In Xcode: **File → New → Target → Notification Service Extension**. Name it `NSE` (or whatever the client prefers).
2. Ensure the `NSE` target is in the `Podfile` with `pod 'indigitall-ios'` (see 4.1).
3. Replace the generated `NotificationService.swift` content with:
**Swift:**
```swift
import UserNotifications
import Indigitall
class NotificationService: UNNotificationServiceExtension {
var contentHandler: ((UNNotificationContent) -> Void)?
var bestAttemptContent: UNMutableNotificationContent?
var request: UNNotificationRequest?
override func didReceive(_ request: UNNotificationRequest,
withContentHandler contentHandler: @escaping (UNNotificationContent) -> Void) {
self.contentHandler = contentHandler
self.request = request
self.bestAttemptContent = (request.content.mutableCopy() as? UNMutableNotificationContent)
Indigitall.didReceive(self.request!, withContentHandler: self.contentHandler!)
}
override func serviceExtensionTimeWillExpire() {
if let contentHandler = contentHandler, let bestAttemptContent = bestAttemptContent {
Indigitall.serviceExtensionTimeWillExpire(bestAttemptContent, withContentHandler: contentHandler)
}
}
}
```
**Objective-C** (`NotificationService.h` and `NotificationService.m`):
```objc
// NotificationService.h
# import
# import
API_AVAILABLE(ios(10.0))
@interface NotificationService : UNNotificationServiceExtension
@end
// NotificationService.m
@interface NotificationService ()
@property (nonatomic, strong) void (^contentHandler)(UNNotificationContent *contentToDeliver);
@property (nonatomic, strong) UNMutableNotificationContent *bestAttemptContent;
@property (nonatomic, strong) UNNotificationRequest *request;
@end
@implementation NotificationService
- (void)didReceiveNotificationRequest:(UNNotificationRequest *)request
withContentHandler:(void (^)(UNNotificationContent * _Nonnull))contentHandler {
self.contentHandler = contentHandler;
self.bestAttemptContent = [request.content mutableCopy];
self.request = request;
[Indigitall didReceiveNotificationRequest:self.request withContentHandler:self.contentHandler];
}
- (void)serviceExtensionTimeWillExpire {
if (self.contentHandler != nil && self.bestAttemptContent != nil) {
[Indigitall serviceExtensionTimeWillExpire:self.bestAttemptContent
withContentHandler:self.contentHandler];
}
}
@end
```
4. Verify the NSE uses the same **Team** and **Bundle ID prefix** as the main app (e.g. `com.mycompany.myapp.NSE`).
5. Verify the NSE has **App Groups** capability enabled if the main app uses it (to share data).
---
## Step 5 — Pre-build verification checklist
### Android checklist
- [ ] `google-services.json` present in `android/app/`
- [ ] `apply plugin: 'com.google.gms.google-services'` in `android/app/build.gradle`
- [ ] `com.google.firebase:firebase-messaging` in dependencies
- [ ] `android.useAndroidX=true` and `android.enableJetifier=true` in `gradle.properties`
- [ ] `BootReceiver`, `CpIndigitallHiddenActivity` and `IndigitallFirebaseMessagingService` in `AndroidManifest.xml`
- [ ] Permissions `INTERNET`, `POST_NOTIFICATIONS`, `RECEIVE_BOOT_COMPLETED` in `AndroidManifest.xml`
- [ ] `onRequestPermissionsResult` added to `MainActivity`
- [ ] If HMS: `agconnect-services.json`, `com.huawei.agconnect` plugin, HMS push dependency and `IndigitallHMSMessagingService`
- [ ] If location: `ACCESS_FINE_LOCATION` and `ACCESS_COARSE_LOCATION` permissions
### iOS checklist
- [ ] `pod 'IndigitallCapacitorPlugin'` in the `App` target of the Podfile
- [ ] `pod 'indigitall-ios'` in the `NSE` target of the Podfile
- [ ] `pod install` completed successfully (`indigitall-ios ~> 6.21.0`)
- [ ] **Push Notifications** capability enabled in Xcode
- [ ] **Background Modes** with `Remote notifications` and `Background fetch` enabled
- [ ] `didRegisterForRemoteNotificationsWithDeviceToken` and `didFailToRegisterForRemoteNotificationsWithError` in `AppDelegate`
- [ ] NSE target created in Xcode with the indigitall `NotificationService` code
- [ ] If location: `NSLocationWhenInUseUsageDescription` in `Info.plist`
---
## Step 6 — Build and validation
```bash
# Android
npx cap sync android
npx cap open android
# Build in Android Studio → Run
# iOS
npx cap sync ios
npx cap open ios
# Build in Xcode → Run
```
After the first launch on a real device (push does not work on simulators), check the logs for:
- `Device init OK: { deviceCode: "...", ... }` — the device has registered successfully with indigitall.
- No errors in the `Indigitall.init` error callback.
Send a test notification from the indigitall dashboard to confirm receipt.
---
## Additional notes
- **Compatibility**: Node.js ≥ 18, TypeScript ≥ 5.3, Capacitor ≥ 8.0.0, Android minSdk 23, iOS 15.6+.
- **Official docs**: https://documentation.indigitall.com/reference/initial-sdk-setup
- **logLevel in production**: Switch from `LogLevel.DEBUG` to `LogLevel.WARNING` or `LogLevel.ERROR` before publishing.
- **Private cloud**: If `urlDeviceApi` is set, verify the endpoint is reachable from the device network.
> ⚠️ AI can make mistakes. Always verify everything it does before treating it as valid.
Our SDK is available via npm.
npm (Node Package Manager) it is a package management system. It consists of a command line client and an online database of public and private packages.
Import the plugin
To import the SDK into your project, follow these steps:
- Open the console and position yourself at the root of the project.
$ cd /PATH/TO/YOUR/PROJECT- Run this line in the console to import the plugin:
$ npm install add indigitall-capacitor-plugin
$ npx cap sync