| This project includes a simple implementation for all features of indigitall SDK for iOS devices. Every feature is implemented in its own activity. |
|---|
| > > Click here to see examples |
What do you need for integration?
- An account to access into indigitall console. If you don't have it, please contact with us here.
- The next thing is to have a project associated with the application web (web browsers) and / or mobile (android, ios). See more details here.
It is important since the project contains the configuration data of your application, that is, the domain where your website is hosted, the safari or iOS certificates or the firebase key that android uses. It all depends on the platforms (web or app) that the project uses.
You will need the App Key of the project, which is the key that our system uses to identify it so it is unique for each project. You can find it in the administration console within the Configuration section in the Projects tab. You can see it in the following image, and to copy it; it is easy to click on the icon next to the key (App Key).

- A valid push certificate for iOS. Learn how to get the push certificate from APNS
- Xcode
- An iOS device to run the app
Integration
This article shows the minimum development that must be done to start registering devices and being able to carry out the first push campaigns.
🤖 Click to expand AI Integration Prompt (ChatGPT / Copilot / Claude)
Copy and paste this prompt into your AI assistant to accelerate your integration:
---
agent: agent
description: Step-by-step integration guide for the Indigitall iOS SDK (push notifications + NSE)
---

You are an expert iOS developer. Your mission is to integrate the Indigitall SDK into the current iOS project by strictly following these steps. **Do not make any changes until you have gathered all the necessary information.**

---

## STEP 1 — Gather information (ask ALL questions before touching any code)

Ask the user the following questions, either one at a time or all at once:

1. **App Key**: What is the `appKey` for your project in the Indigitall console? (You can find it under Settings > Projects.)
2. **Private cloud**: Do you use a private cloud? If so, provide the prefix or subdomain (e.g., `mycompany`). Otherwise, answer "no."
3. **Geolocation**: Do you want to use geolocation for push notifications? (yes / no)
4. **Language**: Does the project use Swift or Objective-C?
5. **Dependency manager**: Do you use CocoaPods or Swift Package Manager (SPM)?

---

## STEP 2 — Preliminary checks

Before modifying any code, review the following and notify the user if there are any issues:

- Confirm that the project has a `Podfile` (if it uses CocoaPods) or that SPM is configured in Xcode (if it uses SPM).
- Confirm that the main target's `deployment target` is **iOS 12.0 or later**.
- Confirm that an `AppDelegate` file exists (Swift: `AppDelegate.swift` / ObjC: `AppDelegate.m`).

---

## STEP 3 — Add the SDK dependency

### If using CocoaPods

Modify the project's `Podfile` by adding `pod 'indigitall-ios'` to **both the main target and the NSE target** (the NSE target will be created in Step 5, but it can be prepared now):

```ruby
target 'YOUR_APP_TARGET' do
  use_frameworks!
  pod 'indigitall-ios'
end

target 'YOUR_NSE_TARGET' do
  use_frameworks!
  pod 'indigitall-ios'
end
```

Tell the user to run the following commands in a terminal:
```bash
pod repo update
pod install
```

Also tell them that **from now on, they must open the `.xcworkspace`**, not the `.xcodeproj`.

### If using Swift Package Manager

Tell the user to go to **File → Add Packages** in Xcode and add this URL:
```
https://bitbucket.org/indigitallfuente/ios-sdk-pod/src/Indigitall/
```
They must add the package to both the **main target** and the **NSE target** (Step 5).

---

## STEP 4 — Configure the AppDelegate

### 4.1 — Imports and UNUserNotificationCenterDelegate conformance

**Swift** — in `AppDelegate.swift`:

```swift
import UIKit
import UserNotifications
import Indigitall

@main
class AppDelegate: UIResponder, UIApplicationDelegate, UNUserNotificationCenterDelegate {
```

**Objective-C** — in `AppDelegate.h`:

```objc
# import
# import
# import

@interface AppDelegate : UIResponder
```

> **Note for Swift**: The SDK is written in Objective-C. If the project uses Swift, it needs a **Bridging Header** with the following content:
> ```objc
> #import
> ```
> If one does not exist yet, create it and configure it under **Build Settings → Swift Compiler – General → Objective-C Bridging Header**.

### 4.2 — `application(_:didFinishLaunchingWithOptions:)`

Add the following lines at the beginning of the method, replacing the values with the information provided by the user:

**Swift**:

```swift
func application(_ application: UIApplication,
                 didFinishLaunchingWithOptions launchOptions: [UIApplication.LaunchOptionsKey: Any]?) -> Bool {

    // Delegate notifications to the AppDelegate
    UNUserNotificationCenter.current().delegate = self

    // Indigitall configuration
    let config = INPushConfig()
    config.appKey = "REPLACE_WITH_APPKEY"
    config.debugMode = IN_DEBUG

    // Geolocation: add ONLY if the user answered "yes" in Step 1
    config.locationPermissionMode = .automatic

    // Private cloud: add ONLY if the user uses a private cloud
    // config.domain = "https://PREFIX.device-api.indigitall.com/v1"

    Indigitall.initialize(with: config, onIndigitallInitialized: { (_, device) in
        print("Indigitall initialized. DeviceId: \(device.deviceID ?? "nil")")
    }, onErrorInitialized: { (error) in
        print("Indigitall error: \(error.errorCode) - \(error.message)")
    })

    return true
}
```

**Objective-C**:

```objc
- (BOOL)application:(UIApplication *)application
    didFinishLaunchingWithOptions:(NSDictionary *)launchOptions {

    [UNUserNotificationCenter currentNotificationCenter].delegate = self;

    INPushConfig *config = [[INPushConfig alloc] init];
    config.appKey = @"REPLACE_WITH_APPKEY";
    config.debugMode = YES; // Change to NO in production

    // Geolocation: add ONLY if the user answered "yes"
    config.locationPermissionMode = INLocationPermissionModeAutomatic;

    // Private cloud: add ONLY if the user uses a private cloud
    // config.domain = @"https://PREFIX.device-api.indigitall.com/v1";

    [Indigitall initializeWith:config
        onIndigitallInitialized:^(NSArray *permissions, Device *device) {
            NSLog(@"Indigitall initialized. DeviceId: %@", device.deviceID);
        }
        onErrorInitialized:^(INError *error) {
            NSLog(@"Indigitall error: %ld - %@", (long)error.errorCode, error.message);
        }];

    return YES;
}
```

### 4.3 — Notification delegate methods

Add these methods to the `AppDelegate`:

**Swift**:

```swift
// Display the notification even when the app is in the foreground
func userNotificationCenter(
    _ center: UNUserNotificationCenter,
    willPresent notification: UNNotification,
    withCompletionHandler completionHandler: @escaping (UNNotificationPresentationOptions) -> Void
) {
    completionHandler(Indigitall.willPresentNotification())
}

// Handle a tap on the notification
func userNotificationCenter(
    _ center: UNUserNotificationCenter,
    didReceive response: UNNotificationResponse,
    withCompletionHandler completionHandler: @escaping () -> Void
) {
    Indigitall.handle(with: response) { (push, action) in
        print("Push received: \(String(describing: push))")
        print("Action: \(String(describing: action.app))")
    }
    completionHandler()
}

// Token registration
func application(_ application: UIApplication, didRegisterForRemoteNotificationsWithDeviceToken deviceToken: Data) {
    Indigitall.setDeviceToken(deviceToken)
}
```

**Objective-C**:

```objc
- (void)userNotificationCenter:(UNUserNotificationCenter *)center
       willPresentNotification:(UNNotification *)notification
         withCompletionHandler:(void (^)(UNNotificationPresentationOptions))completionHandler {
    completionHandler([Indigitall willPresentNotification]);
}

- (void)userNotificationCenter:(UNUserNotificationCenter *)center
didReceiveNotificationResponse:(UNNotificationResponse *)response
         withCompletionHandler:(void (^)(void))completionHandler {
    [Indigitall handleWith:response completion:^(Push *push, PushAction *action) {
        NSLog(@"Push received: %@", push);
        NSLog(@"Action: %@", action.app);
    }];
    completionHandler();
}

// Token registration
- (void)application:(UIApplication *)application didRegisterForRemoteNotificationsWithDeviceToken:(NSData *)deviceToken {
    [Indigitall setDeviceToken:deviceToken];
}
```

---

## STEP 5 — Enable capabilities on the main target

Tell the user to select the app's **main target** in Xcode and:

1. Open the **Signing & Capabilities** tab.
2. Click **+ Capability** and add **Push Notifications**.
3. Click **+ Capability** and add **Background Modes**. Enable:
   - ✅ Background fetch
   - ✅ Remote notifications
4. (Optional) If active background geolocation is required, also enable **Location updates** under Background Modes.

---

## STEP 6 — Create the Notification Service Extension (NSE)

The NSE enables rich notifications containing images, GIFs, videos, and buttons.

Tell the user to follow these manual steps in Xcode:

1. Go to **File → New → Target**.
2. Select **Notification Service Extension** and click Next.
3. Give it a name (e.g., `NotificationServiceExtension`).
4. Confirm that the NSE's **Deployment Target** matches the main target's deployment target (Xcode uses the latest available iOS version by default, so it must be lowered manually).
5. The NSE's **Bundle Identifier** must follow this format: `.NotificationServiceExtension` (Xcode sets it automatically, but verify it).

After creating the NSE, **overwrite** the contents of the `NotificationService` file generated by Xcode:

**Swift** (`NotificationService.swift`):

```swift
import Indigitall
import UserNotifications

class NotificationService: UNNotificationServiceExtension {

    var contentHandler: ((UNNotificationContent) -> Void)?
    var bestAttemptContent: UNMutableNotificationContent?
    var request: UNNotificationRequest?

    override func didReceive(_ request: UNNotificationRequest,
                             withContentHandler contentHandler: @escaping (UNNotificationContent) -> Void) {
        self.contentHandler = contentHandler
        self.request = request
        self.bestAttemptContent = (request.content.mutableCopy() as? UNMutableNotificationContent)

        Indigitall.didReceive(self.request!, withContentHandler: self.contentHandler!)
    }

    override func serviceExtensionTimeWillExpire() {
        if let contentHandler = contentHandler, let bestAttemptContent = bestAttemptContent {
            Indigitall.serviceExtensionTimeWillExpire(bestAttemptContent, withContentHandler: contentHandler)
        }
    }
}
```

**Objective-C** (`NotificationService.h` + `NotificationService.m`):

```objc
// NotificationService.h
# import
# import

API_AVAILABLE(ios(10.0))
@interface NotificationService : UNNotificationServiceExtension
@end
```

```objc
// NotificationService.m
# import "NotificationService.h"

@interface NotificationService ()
@property (nonatomic, strong) void (^contentHandler)(UNNotificationContent *contentToDeliver);
@property (nonatomic, strong) UNMutableNotificationContent *bestAttemptContent;
@property (nonatomic, strong) UNNotificationRequest *request;
@end

@implementation NotificationService

- (void)didReceiveNotificationRequest:(UNNotificationRequest *)request
                   withContentHandler:(void (^)(UNNotificationContent * _Nonnull))contentHandler {
    self.contentHandler = contentHandler;
    self.bestAttemptContent = [request.content mutableCopy];
    self.request = request;

    [Indigitall didReceiveNotificationRequest:self.request withContentHandler:self.contentHandler];
}

- (void)serviceExtensionTimeWillExpire {
    if (self.contentHandler != nil && self.bestAttemptContent != nil) {
        [Indigitall serviceExtensionTimeWillExpire:self.bestAttemptContent
                               withContentHandler:self.contentHandler];
    }
}

@end
```

### Final NSE checks

After creating it, confirm the following with the user:

- [ ] The NSE's **Deployment Target** matches the main target's deployment target.
- [ ] The NSE's **Bundle Identifier** follows the `.` pattern.
- [ ] The `indigitall-ios` library has been added to the NSE target in the `Podfile` (or in SPM).
- [ ] If using CocoaPods, `pod install` was run again after adding the NSE target to the Podfile.

---

## STEP 7 — Geolocation permissions (only if the user answered "yes")

If the user wants geolocation, add the following keys to the main target's `Info.plist` with an appropriate description:

```xml
NSLocationWhenInUseUsageDescription
This app uses your location to send notifications relevant to your area.
NSLocationAlwaysAndWhenInUseUsageDescription
This app needs access to your location in the background for geofence-based notifications.
NSLocationAlwaysUsageDescription
This app needs access to your location in the background for geofence-based notifications.

```

---

## STEP 8 — Final project review

Review the project and notify the user if you detect any of these common issues:

- The `AppDelegate` does not implement `UNUserNotificationCenterDelegate`.
- `UNUserNotificationCenter.current().delegate = self` is missing from `didFinishLaunchingWithOptions`.
- The NSE target does not include the Indigitall dependency.
- The NSE's Deployment Target is higher than the main target's deployment target.
- The NSE's Bundle ID does not follow the correct pattern.
- The project uses Swift but does not have a configured Bridging Header.
- The `Podfile` does not include the NSE target (if using CocoaPods).

---

## STEP 9 — Confirmation and documentation

Once the integration is complete, tell the user:

> ✅ The basic Indigitall SDK integration is complete. Your app can now register devices and receive rich push notifications.
>
> To explore advanced features (geofences, inbox, in-app messages, customer journeys, etc.), see the official documentation:
> 📖 https://documentation.indigitall.com/reference/initial-sdk-setup-6

> ⚠️ AI can make mistakes. Always verify everything it does before treating it as valid.
Adding the SDK dependencies
The SDK is available through CocoaPods.
CocoaPods
The SDK is available through CocoaPods.
CocoaPods is a valid dependency manager for Swift and Objective-C, being the most popular in iOS development.
If you don't have it yet, install CocoaPods. Open your terminal and run the following commands:
$ cd /ROOT/OF/YOUR/PROJECT
$ gem install cocoapods
$ pod init
Follow the step-by-step process outlined in the video:
Swift Package Manager
SPM, or Swift Package Manager, is a tool for distributing iOS code. In the same way that we have explained with CocoaPods. But in this case, to import the package, you have to go to File->Add Pacakages and it will show you the following screen:
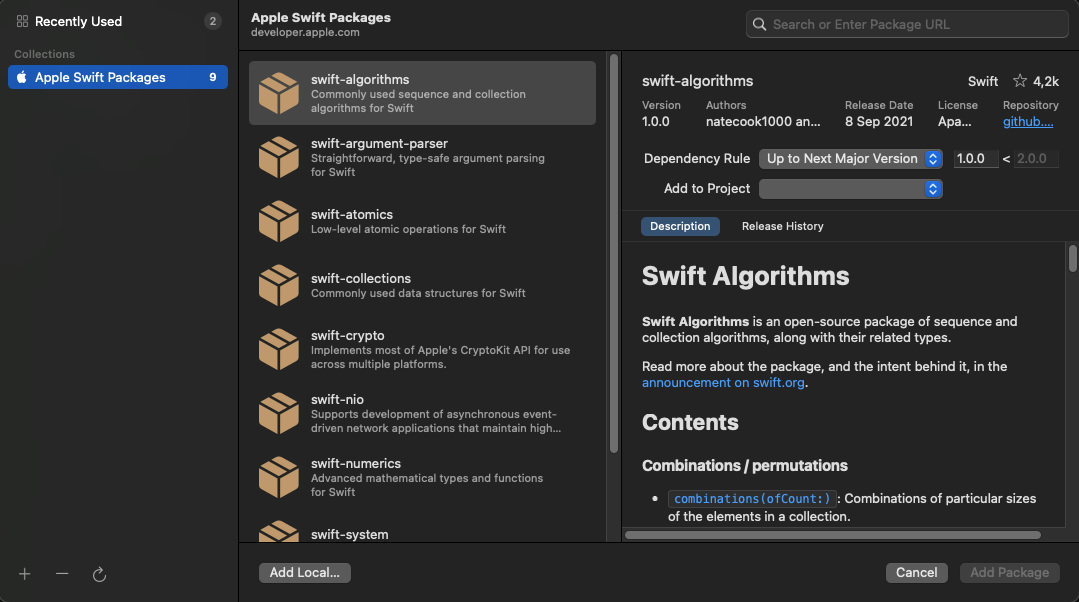
Then, go to the search engine at the top right, and add the following url: https://bitbucket.org/indigitallfuente/ios-sdk-pod/src/Indigitall/ as show below
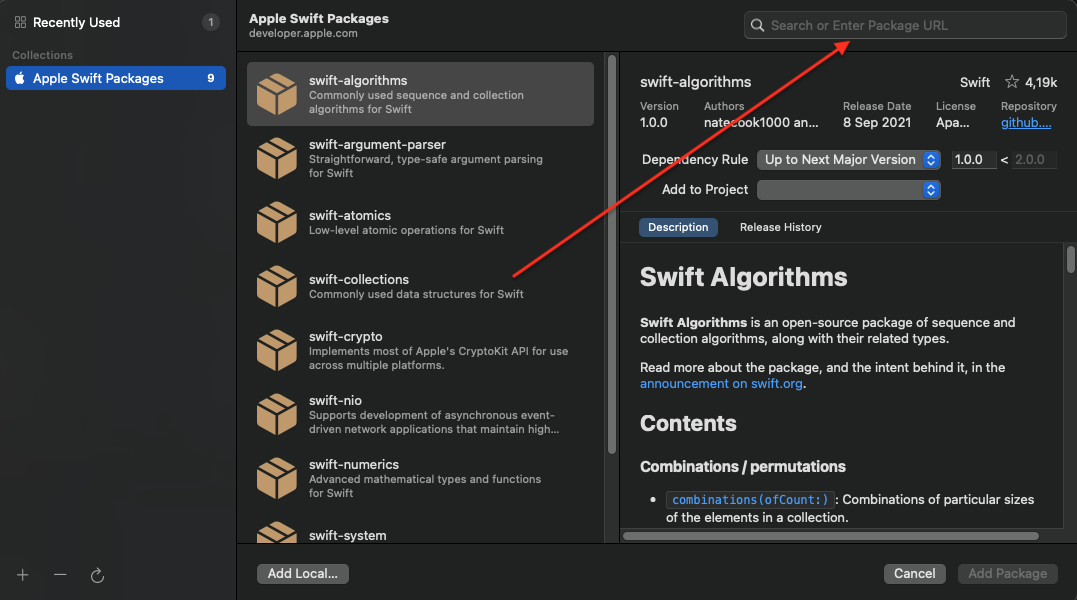
You add the package, and you can continue with the integration.

Follow the step-by-step process outlined in the video:
Notification Service Extension
From the release of iOS 10 , apps can manage rich push notifications, that is, with images, gif, video, buttons, etc.
In order to use these features, your app needs to implement the Notification Service Extension.
-
- Add a new Notification Service Extension to your project (Xcode: File> New> Target) .
-
- Add the extension target** in your application.
-
- Once created, you have to look at two points in the NSE target:
- The Bundle identifier has to be the same as that of the app plus the Display name of the NSE.
- In the deployment info field, you must indicate the minimum iOS system that you want to impact, so we recommend that it be the same as the one you have planned in the app.
- Once created, you have to look at two points in the NSE target:
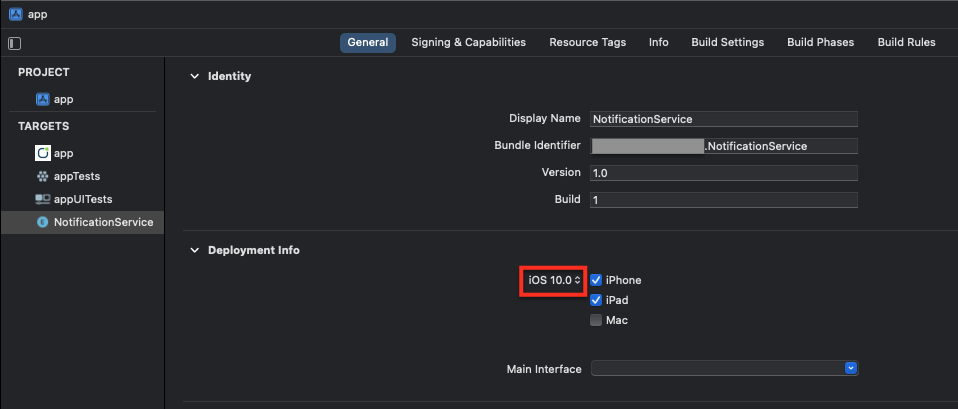
* You have to be careful at this point because Xcode when creating the target, configures the deployment info in the latest iOS system available. If you do not put it right, on devices below the indicated target it will not show rich notifications.*4. The file NotificationService will have been created within this target. Overwrite all content with the following code:
import Indigitall
class NotificationService: UNNotificationServiceExtension {

    var contentHandler: ((UNNotificationContent) -> Void)?
    var bestAttemptContent: UNMutableNotificationContent?
    var request: UNNotificationRequest?

    override func didReceive(_ request: UNNotificationRequest, withContentHandler contentHandler: @escaping (UNNotificationContent) -> Void) {
        self.contentHandler = contentHandler
        self.request = request
        self.bestAttemptContent = (request.content.mutableCopy() as? UNMutableNotificationContent)

        Indigitall.didReceive(self.request!, withContentHandler: self.contentHandler!)
    }

    override func serviceExtensionTimeWillExpire() {
        if let contentHandler = contentHandler, let bestAttemptContent = bestAttemptContent {
            Indigitall.serviceExtensionTimeWillExpire(bestAttemptContent, withContentHandler: contentHandler)
        }
    }

}
#import <UserNotifications/UserNotifications.h>
#import <Indigitall/Indigitall.h>
API_AVAILABLE(ios(10.0))
//NotificaiontService.h
@interface NotificationService : UNNotificationServiceExtension
@end
//NotificationService.m
@interface NotificationService ()
@property (nonatomic, strong) void (^contentHandler)(UNNotificationContent *contentToDeliver);
@property (nonatomic, strong) UNMutableNotificationContent *bestAttemptContent;
@property (nonatomic, strong) UNNotificationRequest *request;
@end
@implementation NotificationService
- (void)didReceiveNotificationRequest:(UNNotificationRequest *)request withContentHandler:(void (^)(UNNotificationContent * _Nonnull))contentHandler {
self.contentHandler = contentHandler;
self.bestAttemptContent = [request.content mutableCopy];
self.request = request;
[Indigitall didReceiveNotificationRequest:self.request withContentHandler:self.contentHandler];
}
- (void)serviceExtensionTimeWillExpire {
if (self.contentHandler != nil && self.bestAttemptContent != nil){
[Indigitall serviceExtensionTimeWillExpire:self.bestAttemptContent withContentHandler:self.contentHandler];
}
}
@endSwift application
Our SDK s developed in OBJ-C, so you need to add the import in a .h class like bridging header:
#import <Indigitall/Indigitall.h>
#import <IndigitallInApp/IndigitallInApp.h>
You have to add onto your Build settings:
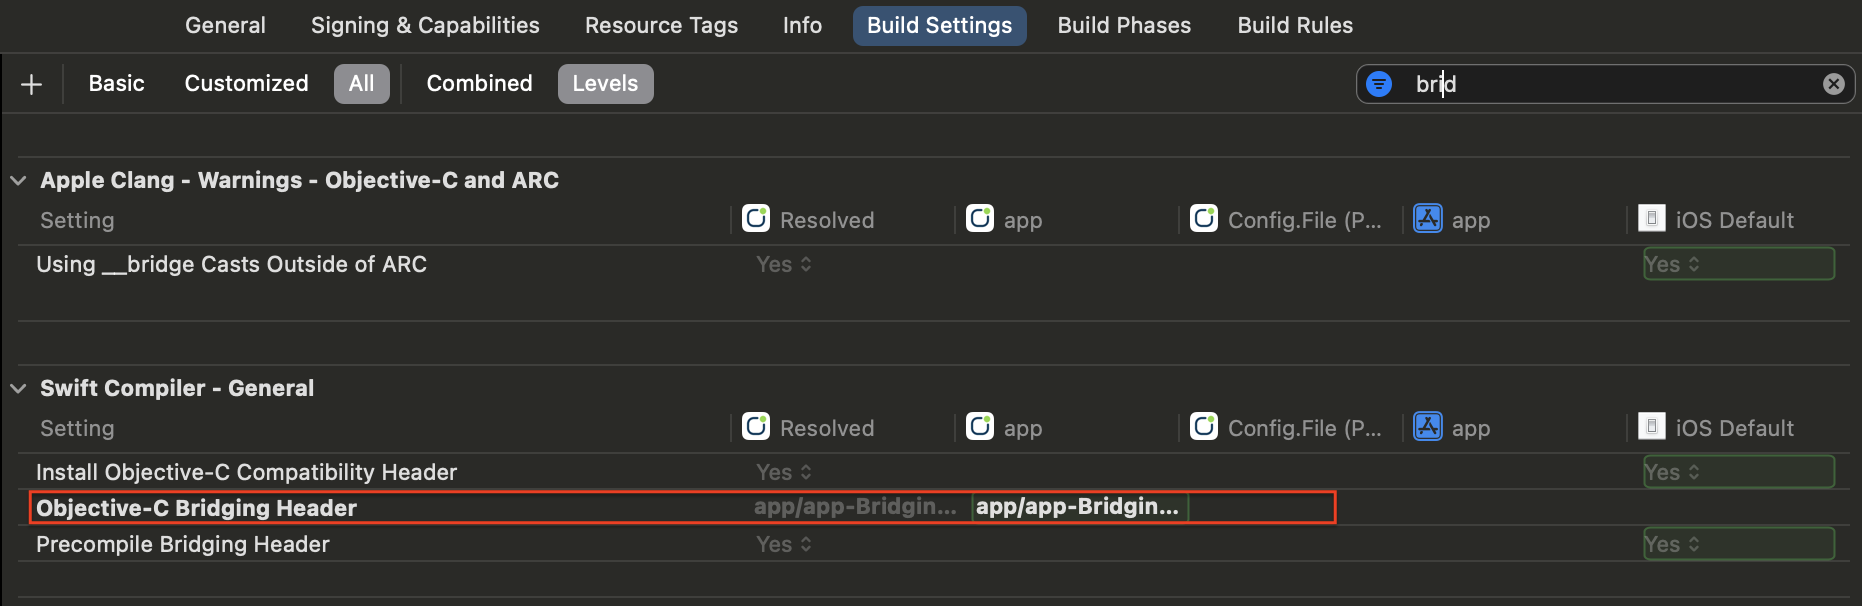
Configuration
Modify the PodFile file of your project and add this code:
target '<YourTarget>' do
    pod 'indigitall-ios'
end
target '<YourTargetNotificationExtension>' do
    pod 'indigitall-ios'
end
Remember:Add the corresponding pod from the SDK inside the names of the target that your application has.
Update the CocoaPod repository and install the dependencies from the terminal:
$ pod repo update
$ pod install
AttentionFrom here you must use .workspace instead of .xcproject to work on the project.
The main difference is that .xcproject is for a single project and .workspace can contain multiple projects.
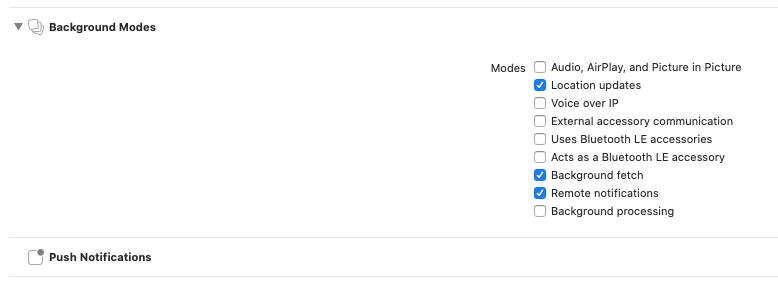
Activate the capabilities
- Push Notifications in Background Modes
- Location updates
- Background Fetch
- Remote notifications
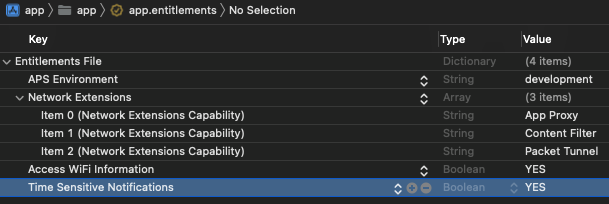
Time Sensitive Entitlement
If you want to send notifications that can skip the scheduled summary of the user (from iOS 15), you must add the following field in the application entitlement: