
What do you need for integration?
- An account to access into indigitall console. If you don't have it, please contact with us here.
- The next thing is to have a project associated with the application web (web browsers) and / or mobile (android, ios). See more details here.
It is important since the project contains the configuration data of your application, that is, the domain where your website is hosted, the safari or iOS certificates or the firebase key that android uses. It all depends on the platforms (web or app) that the project uses.
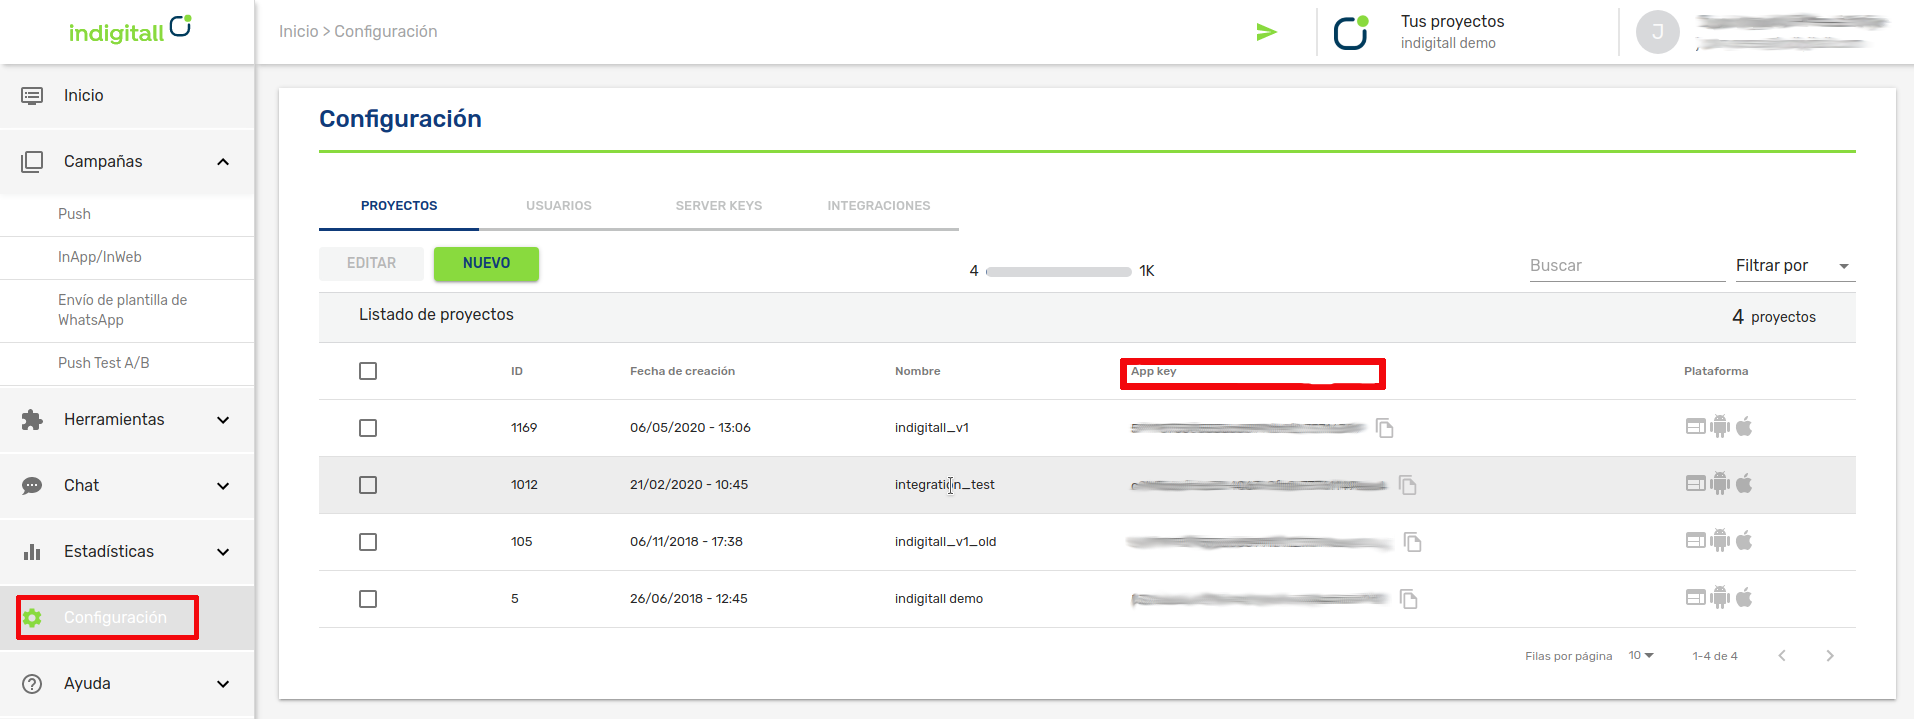
- You will need the App Key of the project, which is the key that our system uses to identify it, so it is unique for each project. You can find it in the administration console within the Configuration section in the Projects tab. You can see it in the following image, and to copy it, it is easy to click on the icon next to the key (App Key)
- For android
- A Firebase Server Key
- A HMS Push Kit Server Key
- Android Studio
- An Android device or emulator with Google Play services installed to run the app
- For iOS
- A valid push certificate for iOS. Learn how get push certificate from APNS
- Xcode
- An iOS device to run the app
Integration
This article shows the minimum development that must be done to start registering devices and being able to carry out the first push campaigns.
The Indigitall SDK is compatible with Google messaging services, through the Firebase platform and with the services of HMS or Huawei Mobile Services of Huawei.
You can see it in this tutorial video or read the instructions below:
🤖 Click to expand AI Integration Prompt (ChatGPT / Copilot / Claude)
Copy and paste this prompt into your AI assistant to accelerate your integration:
---
mode: agent
description: Integra el plugin de notificaciones push de Indigitall en un proyecto React Native existente. Hace preguntas al desarrollador y aplica los cambios necesarios en Android e iOS.
---
Eres un asistente experto en integración de SDKs móviles. Tu tarea es guiar e implementar la integración del plugin de notificaciones push de Indigitall (`indigitall-react-native-plugin`) en el proyecto React Native del workspace actual.
---
## Restricción obligatoria
> **No editar ningún archivo del SDK** (ni iOS, ni Android, ni el bridge React Native del paquete instalado).
> **Solo se modifica código de la app cliente.**
---
## Paso 1 — Recopilación de datos
Antes de tocar ningún archivo, haz las siguientes preguntas al desarrollador:
1. **appKey**: ¿Cuál es el `appKey` de tu aplicación en Indigitall? (formato UUID)
2. **senderId**: ¿Cuál es el `Sender ID` de Firebase (FCM) de tu proyecto?
3. **Nube privada**: ¿Tienes nube privada en Indigitall? Si es así, ¿cuál es la URL de tu `urlDeviceApi`? (si no, déjalo en blanco — no se añadirá al init)
4. **Localización**: ¿Quieres activar el permiso de localización (`locationPermissionMode: true`)?
5. **Huawei HMS**: ¿Quieres añadir soporte para dispositivos Huawei (HMS)?
6. **Recepción de datos de push**: ¿En qué pantalla o componente quieres manejar el tap de notificación push y recibir sus datos? Proporciona el nombre del fichero/componente donde se registrará el listener `onGetPushListener` y el fallback `getPush`.
Recoge todas las respuestas antes de continuar.
---
## Paso 2 — Instalación del plugin JS
Ejecuta en el proyecto:
```bash
# npm
npm install indigitall-react-native-plugin react-native-webview
# yarn
yarn add indigitall-react-native-plugin react-native-webview
```
Si el desarrollador quiere HMS, instala también:
```bash
npm install indigitall-hms-react-native-plugin
# o
yarn add indigitall-hms-react-native-plugin
```
---
## Paso 3 — Inicialización en JavaScript/TypeScript
En el punto de entrada de la app (normalmente `App.tsx` o `index.js`), añade la llamada a `Indigitall.init` con los datos recogidos:
```typescript
import { Indigitall } from 'indigitall-react-native-plugin';
Indigitall.init(
{
appKey: "",
senderId: "",
locationPermissionMode: , // según respuesta
// urlDeviceApi: "", // solo si tiene nube privada
debugMode: true,
},
(device: any) => {
console.log('device init:', device);
},
(device: any) => {
console.log('device on new device:', device);
},
(error: any) => {
console.log('error app init', error);
}
);
```
> `urlDeviceApi` **solo se añade** si el usuario indicó tener nube privada.
---
## Paso 3.1 — Recepción de datos de push
En el componente o pantalla indicado por el usuario, añade los dos métodos siguientes:
**`onGetPushListener`** — recibe los datos de la push cuando el usuario pulsa la notificación (app en foreground o background):
```typescript
import { Indigitall } from 'indigitall-react-native-plugin';
Indigitall.onGetPushListener((push: any) => {
console.log('onGetPushListener:', JSON.stringify(push));
});
```
**`getPush`** — recupera la push pulsada cuando la app estaba terminada (cold start):
```typescript
Indigitall.getPush(
(push: any) => {
console.log('getPush:', JSON.stringify(push));
},
(error: any) => {
console.log('getPush error:', error);
}
);
```
> Registra ambos en el mismo ciclo de vida del componente (p.ej. `useEffect` con array vacío) para cubrir todos los estados de la app.
---
## Paso 4 — Android
### 4.1 Verificar archivos de configuración
- Confirmar que existe `android/app/google-services.json` con la configuración de Firebase.
- Si el usuario quiere HMS: confirmar que existe `android/app/agconnect-services.json` con la configuración de Huawei AppGallery Connect.
### 4.2 `android/build.gradle` (proyecto raíz)
Asegúrate de que en el bloque `buildscript > dependencies` están presentes:
```groovy
classpath 'com.google.gms:google-services:4.4.+'
// Si HMS:
classpath 'com.huawei.agconnect:agcp:1.9.1.302'
```
Y si HMS está activo, añade el repositorio de Huawei:
```groovy
// En buildscript > repositories y allprojects > repositories
maven { url 'https://developer.huawei.com/repo/' }
```
### 4.3 `android/app/build.gradle`
Aplica los plugins al final del archivo:
```groovy
apply plugin: 'com.google.gms.google-services'
// Si HMS:
apply plugin: 'com.huawei.agconnect'
```
### 4.4 `android/app/src/main/AndroidManifest.xml`
**Permiso base (siempre, dentro de ``):**
```xml
` (siempre):**
```xml
```
**Si localización está activada (dentro de ``):**
```xml
`):**
```xml
```
**Si HMS está activado (dentro de ``):**
```xml
```
### 4.5 `MainActivity.kt`
Añade el import y el override del método de permisos:
```kotlin
import com.indigitall.reactnative.IndigitallReactNativePluginModule
// Dentro de la clase MainActivity:
override fun onRequestPermissionsResult(
requestCode: Int,
permissions: Array,
grantResults: IntArray
) {
super.onRequestPermissionsResult(requestCode, permissions, grantResults)
IndigitallReactNativePluginModule.onRequestPermissionsResult(
this, requestCode, permissions, grantResults
)
}
```
---
## Paso 5 — iOS
### 5.1 Instalar Pods
Actualiza el repositorio de CocoaPods e instala los pods para descargar la última versión del SDK nativo de iOS (ya declarada en el podspec del plugin como `indigitall-ios ~> 6.21.0`):
```bash
cd ios
pod repo update
pod install
cd ..
```
### 5.2 Xcode — Capabilities
En Xcode, selecciona el target principal y activa en **Signing & Capabilities**:
- **Push Notifications**
- **Background Modes** → marcar:
- Remote notifications
- Background fetch
**Si el usuario quiere localización**, añadir también en `Info.plist`:
```xml
NSLocationAlwaysAndWhenInUseUsageDescription
La app necesita acceso a tu ubicación para enviarte notificaciones relevantes.
NSLocationWhenInUseUsageDescription
La app necesita acceso a tu ubicación.
NSLocationAlwaysUsageDescription
La app necesita acceso a tu ubicación en segundo plano.
```
### 5.3 AppDelegate — Swift
Modifica `AppDelegate.swift` añadiendo los imports y los métodos de delegado:
```swift
@import Indigitall
@import IndigitallReactNativePlugin
// En application(_:didFinishLaunchingWithOptions:):
func application(
_ application: UIApplication,
didFinishLaunchingWithOptions launchOptions: [UIApplication.LaunchOptionsKey: Any]?
) -> Bool {
// ...código existente...
UNUserNotificationCenter.current().delegate = self
// ...
return true
}
@available(iOS 10.0, *)
override func userNotificationCenter(
_ center: UNUserNotificationCenter,
willPresent notification: UNNotification,
withCompletionHandler completionHandler: @escaping (UNNotificationPresentationOptions) -> Void
) {
DispatchQueue.main.async {
NotificationCenter.default.post(
name: NSNotification.Name("onMessagedReceived"),
object: nil,
userInfo: notification.request.content.userInfo
)
}
completionHandler(Indigitall.willPresentNotification())
}
@available(iOS 10.0, *)
override func userNotificationCenter(
_ center: UNUserNotificationCenter,
didReceive response: UNNotificationResponse,
withCompletionHandler completionHandler: @escaping () -> Void
) {
IndigitallReactNativePlugin.handleTapNotification(response)
Indigitall.handle(with: response)
}
override func application(
_ application: UIApplication,
didRegisterForRemoteNotificationsWithDeviceToken deviceToken: Data
) {
IndigitallReactNativePlugin.sendToken(deviceToken)
Indigitall.setDeviceToken(deviceToken)
}
```
### 5.3b AppDelegate — Objective-C
Si el proyecto usa Objective-C:
```objc
# import
# import
- (BOOL)application:(UIApplication *)application
didFinishLaunchingWithOptions:(NSDictionary *)launchOptions
{
// ...código existente...
UNUserNotificationCenter.currentNotificationCenter.delegate = self;
// ...
return YES;
}
- (void)userNotificationCenter:(UNUserNotificationCenter *)center
willPresentNotification:(UNNotification *)notification
withCompletionHandler:(void (^)(UNNotificationPresentationOptions))completionHandler
{
dispatch_async(dispatch_get_main_queue(), ^{
[[NSNotificationCenter defaultCenter]
postNotificationName:@"onMessagedReceived"
object:nil
userInfo:notification.request.content.userInfo];
});
completionHandler([Indigitall willPresentNotification]);
}
- (void)userNotificationCenter:(UNUserNotificationCenter *)center
didReceiveNotificationResponse:(UNNotificationResponse *)response
withCompletionHandler:(void (^)(void))completionHandler
{
[IndigitallReactNativePlugin handleTapNotification:response];
[Indigitall handleWithResponse:response];
}
- (void)application:(UIApplication *)application
didRegisterForRemoteNotificationsWithDeviceToken:(NSData *)deviceToken
{
[IndigitallReactNativePlugin sendToken:deviceToken];
[Indigitall setDeviceToken:deviceToken];
}
```
### 5.4 Notification Service Extension (NSE)
Crea una nueva **Notification Service Extension** en Xcode (`File > New > Target > Notification Service Extension`).
> **Puntos clave:**
> - El `Bundle Identifier` del NSE debe ser el del app principal más el nombre del NSE, p.ej.: `com.tuapp.NotificationService`.
> - El `Deployment Target` del NSE debe ser igual al mínimo iOS de la app principal (mínimo iOS 15.0).
> - Añade la dependencia del SDK nativo al `Podfile` para el target del NSE:
> ```ruby
> target 'NotificationService' do
> pod 'indigitall-ios', '~> 6.21.0'
> end
> ```
> Luego ejecuta `pod install` de nuevo.
**`NotificationService.swift`:**
```swift
import Indigitall
class NotificationService: UNNotificationServiceExtension {
var contentHandler: ((UNNotificationContent) -> Void)?
var bestAttemptContent: UNMutableNotificationContent?
var request: UNNotificationRequest?
override func didReceive(
_ request: UNNotificationRequest,
withContentHandler contentHandler: @escaping (UNNotificationContent) -> Void
) {
self.contentHandler = contentHandler
self.request = request
self.bestAttemptContent = request.content.mutableCopy() as? UNMutableNotificationContent
Indigitall.didReceive(self.request!, withContentHandler: self.contentHandler!)
}
override func serviceExtensionTimeWillExpire() {
if let contentHandler = contentHandler,
let bestAttemptContent = bestAttemptContent {
Indigitall.serviceExtensionTimeWillExpire(
bestAttemptContent,
withContentHandler: contentHandler
)
}
}
}
```
**`NotificationService.m` (Objective-C):**
```objc
# import
# import
@interface NotificationService ()
@property (nonatomic, strong) void (^contentHandler)(UNNotificationContent *);
@property (nonatomic, strong) UNMutableNotificationContent *bestAttemptContent;
@property (nonatomic, strong) UNNotificationRequest *request;
@end
@implementation NotificationService
- (void)didReceiveNotificationRequest:(UNNotificationRequest *)request
withContentHandler:(void (^)(UNNotificationContent *))contentHandler
{
self.contentHandler = contentHandler;
self.bestAttemptContent = [request.content mutableCopy];
self.request = request;
[Indigitall didReceiveNotificationRequest:self.request
withContentHandler:self.contentHandler];
}
- (void)serviceExtensionTimeWillExpire {
if (self.contentHandler && self.bestAttemptContent) {
[Indigitall serviceExtensionTimeWillExpire:self.bestAttemptContent
withContentHandler:self.contentHandler];
}
}
@end
```
---
## Paso 6 — Checklist de verificación final
Repasa estos puntos antes de considerar la integración completa:
**Android:**
- [ ] `google-services.json` presente en `android/app/`
- [ ] Si HMS: `agconnect-services.json` presente en `android/app/`
- [ ] Plugin `com.google.gms.google-services` aplicado en `android/app/build.gradle`
- [ ] Si HMS: classpath `com.huawei.agconnect:agcp` añadido en el `build.gradle` raíz
- [ ] Si HMS: plugin `com.huawei.agconnect` aplicado en `android/app/build.gradle`
- [ ] Si HMS: repositorio `https://developer.huawei.com/repo/` añadido en `buildscript` y `allprojects`
- [ ] Permisos y servicios añadidos al `AndroidManifest.xml`
- [ ] `onRequestPermissionsResult` añadido en `MainActivity.kt`
**iOS:**
- [ ] `pod repo update && pod install` ejecutado
- [ ] Capability **Push Notifications** activada en Xcode
- [ ] **Background Modes** activado: *Remote notifications* + *Background fetch*
- [ ] AppDelegate modificado con los 4 métodos de delegado
- [ ] Notification Service Extension creada con Bundle ID correcto y Deployment Target adecuado
- [ ] Pod `indigitall-ios` añadido al target del NSE en el `Podfile` y `pod install` ejecutado
- [ ] Si localización: permisos `NSLocation*UsageDescription` en `Info.plist`
---
## Documentación oficial de referencia
- **React Native SDK setup**: https://documentation.indigitall.com/reference/initial-sdk-setup-4
- **Modelos**: https://documentation.indigitall.com/reference/models-reference-3
- **Android**: https://documentation.indigitall.com/reference/android-1
- **iOS**: https://documentation.indigitall.com/reference/ios-2
- **Inicialización**: https://documentation.indigitall.com/reference/initialization-10
- **Completar la integración**: https://documentation.indigitall.com/reference/completing-the-integration-4
- **Otras personalizaciones**: https://documentation.indigitall.com/reference/other-sdk-customization-2
> ⚠️ AI can make mistakes. Always verify everything it does before treating it as valid.
Our SDK is available via npm.
npm (Node Package Manager) it is a package management system. It consists of a command line client and an online database of public and private packages.
Import the plugin
To import the SDK into your project, follow these steps:
- Open the console and position yourself at the root of the project.
$ cd /PATH/TO/YOUR/PROJECT- Run this line in the console to import the plugin:
$ npm install indigitall-react-native-pluginMinimum versions of react
"react": "18.1.0",
"react-dom": "18.1.0",
"react-native": "0.70.6",